2020年1月28日,Linux之父Linus Torvalds正式将WireGuard merge到Linux 5.6版本内核主线:
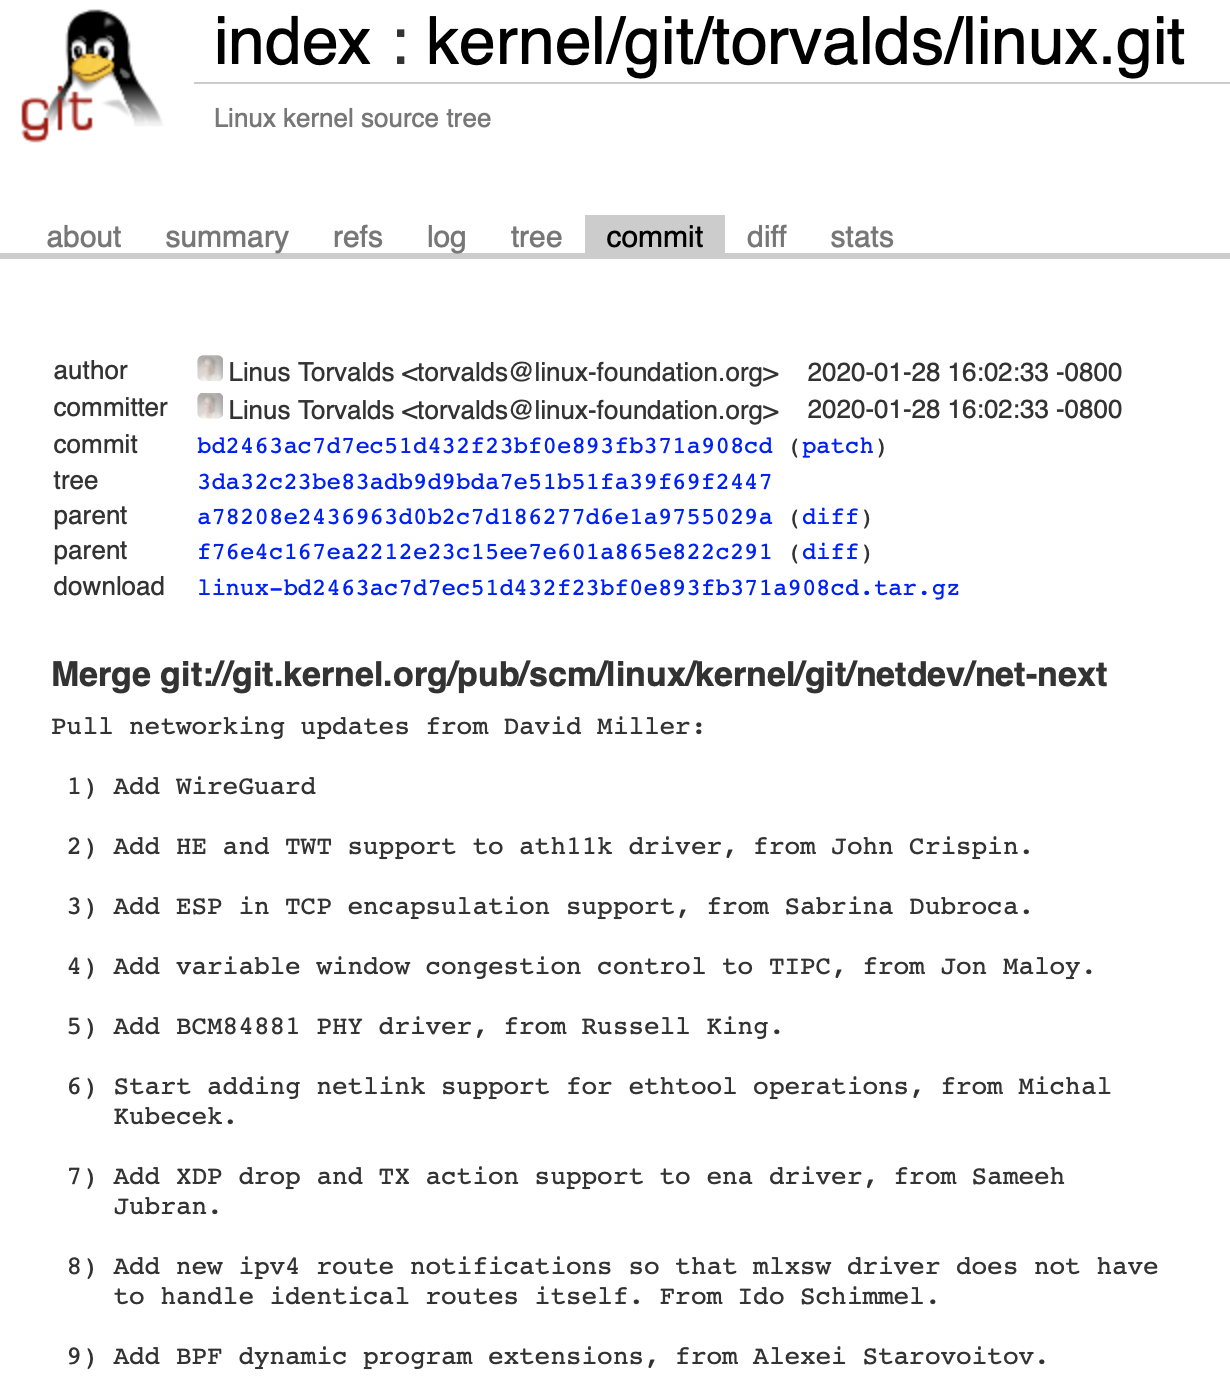
图:WireGuard被加入linux kernel 5.6主线的commit log
这意味着在Linux 5.6内核发布时,linux在内核层面将原生支持一个新的VPN协议栈:WireGuard。
![]()
图:WireGuard Logo
一. VPN与WireGuard的创新
VPN,全称Virtual Private Network(虚拟专用网络)。提起VPN,大陆的朋友想到的第一件事就是fan qiang。其实fan qiang只是VPN的一个“小众”应用罢了^_^,企业网络才是VPN真正施展才能的地方。VPN支持在不安全的公网上建立一条加密的、安全的到企业内部网络的通道(隧道tunnel),这就好比专门架设了一个专用网络那样。在WireGuard出现之前,VPN的隧道协议主要有PPTP、L2TP和IPSec等,其中PPTP和L2TP协议工作在OSI模型的第二层,又称为二层隧道协议;IPSec是第三层隧道协议。
既然已经有了这么多的VPN协议,那么Why WireGuard?
WireGuard的作者Jason A. Donenfeld在WireGuard官网给出了很明确地理由:
- 简单、易用、无连接、无状态:号称目前最易用和最简单的VPN解决方案
WireGuard可以像SSH一样易于配置和部署。只需交换非常简单的公钥就可以建立VPN连接,就像交换SSH密钥一样,其余所有由WireGuard透明处理。并且WireGuard建立的VPN连接是基于UDP的,无需建立和管理连接,无需关心和管理状态的。
- 先进加密协议
WireGuard充分利用安全领域和密码学在这些年的最新成果,使用noise framework,Curve25519,ChaCha20,Poly1305,BLAKE2,SipHash24等构建WireGuard的安全方案。
- 最小的攻击面(最少代码实现)
WireGuard的内核模块c代码仅不足5k行,便于代码安全评审。也使得WireGuard的实现更不容易被攻击(代码量少,理论上漏洞相对于庞大的代码集合而言也会少许多)。
- 高性能
密码学最新成果带来的高速机密原语和WireGuard的内核驻留机制,使其相较于之前的VPN方案更具性能优势。
以上这些理由,同时也是WireGuard这个协议栈的特性。
这么说依然很抽象,我们来实操一下,体验一下WireGuard的简洁、易用、安全、高效。
二. WireGuard安装和使用
WireGuard将在linux 5.6内核中提供原生支持,也就是说在那之前,我们还无法直接使用WireGuard,安装还是不可避免的。在我的实验环境中有两台Linux VPS主机,都是ubuntu 18.04,内核都是4.15.0。因此我们需要首先添加WireGuard的ppa仓库:
sudo add-apt-repository ppa:wireguard/wireguard
更新源后,即可通过下面命令安装WireGuard:
sudo apt-get update

sudo apt-get install wireguard
安装的WireGuard分为两部分:
-
WireGuard内核模块(wireguard.ko),这部分通过动态内核模块技术DKMS安装到ubuntu的内核模块文件目录下:
$ ls /lib/modules/4.15.0-29-generic/updates/dkms/ wireguard.ko
-
用户层的命令行工具
类似于内核netfilter和命令行工具iptables之间关系,wireguard.ko对应的用户层命令行工具wireguard-tools:wg、wg-quick被安装到/usr/bin下面了:
$ ls -t /usr/bin|grep wg|head -n 2
wg
wg-quick
1. peer to peer vpn
在两个linux Vps上都安装完WireGuard后,我们就可以在两个节点(peer)建立虚拟专用网络(VPN)了。我们分为称两个linux节点为peer1和peer2:
图:点对点wireguard通信图
就像上图那样,我们只分别需要在peer1和peer2建立/etc/wireguard/wg0.conf。
peer1的/etc/wireguard/wg0.conf:
[Interface]
PrivateKey = {peer1's privatekey}
Address = 10.0.0.1
ListenPort = 51820

[Peer]
PublicKey = {peer2's publickey}
EndPoint = {peer2's ip}:51820
AllowedIPs = 10.0.0.2/32
peer2的/etc/wireguard/wg0.conf:
[Interface]
PrivateKey = {peer2's privatekey}
Address = 10.0.0.2
ListenPort = 51820

[Peer]
PublicKey = {peer1's publickey}
EndPoint = {peer1's ip}:51820
AllowedIPs = 10.0.0.1/32
我们看到每个peer上WireGuard所需的配置文件wg0.conf包含两大部分:
-
[Interface]部分-
PrivateKey – peer自身的privatekey
-
Address – peer的wg0接口在vpn网络中绑定的路由ip范围,在上述例子中仅绑定了一个ip地址
-
ListenPort – wg网络协议栈监听UDP端口
-
-
[Peer]部分(描述vpn网中其他peer信息,一个wg0配置文件中显然可以配置多个Peer部分)-
PublicKey – 该peer的publickey
-
EndPoint – 该peer的wg网路协议栈地址(ip+port)
-
AllowedIPs – 允许该peer发送过来的wireguard载荷中的源地址范围。同时本机而言,这个字段也会作为本机路由表中wg0绑定的ip范围。
-
每个Peer自身的privatekey和publickey可以通过WireGuard提供的命令行工具生成:
$ wg genkey | tee privatekey | wg pubkey > publickey
$ ls
privatekey  publickey
注:这两个文件可以生成在任意路径下,我们要的是两个文件中内容。
在两个peer上配置完/etc/wireguard/wg0.conf配置文件后,我们就可以使用下面命令在peer1和peer2之间建立一条双向加密VPN隧道了:
peer1:

$ sudo wg-quick up wg0
[#] ip link add wg0 type wireguard
[#] wg setconf wg0 /dev/fd/63
[#] ip -4 address add 10.0.0.1 dev wg0
[#] ip link set mtu 1420 up dev wg0
[#] ip -4 route add 10.0.0.2/32 dev wg0

peer2:

$ sudo wg-quick up wg0
[#] ip link add wg0 type wireguard
[#] wg setconf wg0 /dev/fd/63
[#] ip -4 address add 10.0.0.2 dev wg0
[#] ip link set mtu 1420 up dev wg0
[#] ip -4 route add 10.0.0.1/32 dev wg0
执行上述命令,每个peer会增加一个network interface dev: wg0,并在系统路由表中增加一条路由,以peer1为例:
$ ip a

... ...

4: wg0: <POINTOPOINT,NOARP,UP,LOWER_UP> mtu 1420 qdisc noqueue state UNKNOWN group default qlen 1000
    link/none
    inet 10.0.0.1/32 scope global wg0
       valid_lft forever preferred_lft forever

$ ip route
default via 172.21.0.1 dev eth0 proto dhcp metric 100
10.0.0.2 dev wg0 scope link
... ...
现在我们来测试两个Peer之间的连通性。WireGuard的peer之间是对等的,谁发起的请求谁就是client端。我们在peer1上ping peer2,在peer2上我们用tcpdump抓wg0设备的包:
Peer1:

$ ping -c 3 10.0.0.2
PING 10.0.0.2 (10.0.0.2) 56(84) bytes of data.
64 bytes from 10.0.0.2: icmp_seq=1 ttl=64 time=34.9 ms
64 bytes from 10.0.0.2: icmp_seq=2 ttl=64 time=34.7 ms
64 bytes from 10.0.0.2: icmp_seq=3 ttl=64 time=34.6 ms

--- 10.0.0.2 ping statistics ---
3 packets transmitted, 3 received, 0% packet loss, time 2002ms
rtt min/avg/max/mdev = 34.621/34.781/34.982/0.262 ms

Peer2:

# tcpdump -i wg0
tcpdump: verbose output suppressed, use -v or -vv for full protocol decode
listening on wg0, link-type RAW (Raw IP), capture size 262144 bytes
13:29:52.659550 IP 10.0.0.1 > instance-cspzrq3u: ICMP echo request, id 20580, seq 1, length 64
13:29:52.659603 IP instance-cspzrq3u > 10.0.0.1: ICMP echo reply, id 20580, seq 1, length 64
13:29:53.660463 IP 10.0.0.1 > instance-cspzrq3u: ICMP echo request, id 20580, seq 2, length 64
13:29:53.660495 IP instance-cspzrq3u > 10.0.0.1: ICMP echo reply, id 20580, seq 2, length 64
13:29:54.662201 IP 10.0.0.1 > instance-cspzrq3u: ICMP echo request, id 20580, seq 3, length 64
13:29:54.662234 IP instance-cspzrq3u > 10.0.0.1: ICMP echo reply, id 20580, seq 3, length 64
我们看到peer1和peer2经由WireGuard建立的vpn实现了连通:在peer2上ping peer1(10.0.0.1)亦得到相同结果。
这时如果我们如果在peer2(vpn ip: 10.0.0.2)上启动一个http server(监听0.0.0.0:9090):
//httpserver.go
package main

import "net/http"

func index(w http.ResponseWriter, r *http.Request) {
    w.Write([]byte("hello, wireguard\n"))
}

func main() {
    http.Handle("/", http.HandlerFunc(index))
    http.ListenAndServe(":9090", nil)
}
那么我们在peer1(vpn ip:10.0.0.1)去访问这个server:
$ curl http://10.0.0.2:9090
hello, wireguard
在peer2(instance-cspzrq3u)上的tcpdump显示(tcp握手+数据通信+tcp拆除):
14:15:05.233794 IP 10.0.0.1.43922 > instance-cspzrq3u.9090: Flags [S], seq 1116349511, win 27600, options [mss 1380,sackOK,TS val 3539789774 ecr 0,nop,wscale 7], length 0
14:15:05.233854 IP instance-cspzrq3u.9090 > 10.0.0.1.43922: Flags [S.], seq 3504538202, ack 1116349512, win 27360, options [mss 1380,sackOK,TS val 2842719516 ecr 3539789774,nop,wscale 7], length 0
14:15:05.268792 IP 10.0.0.1.43922 > instance-cspzrq3u.9090: Flags [.], ack 1, win 216, options [nop,nop,TS val 3539789809 ecr 2842719516], length 0
14:15:05.268882 IP 10.0.0.1.43922 > instance-cspzrq3u.9090: Flags [P.], seq 1:78, ack 1, win 216, options [nop,nop,TS val 3539789809 ecr 2842719516], length 77
14:15:05.268907 IP instance-cspzrq3u.9090 > 10.0.0.1.43922: Flags [.], ack 78, win 214, options [nop,nop,TS val 2842719551 ecr 3539789809], length 0
14:15:05.269514 IP instance-cspzrq3u.9090 > 10.0.0.1.43922: Flags [P.], seq 1:134, ack 78, win 214, options [nop,nop,TS val 2842719552 ecr 3539789809], length 133
14:15:05.304147 IP 10.0.0.1.43922 > instance-cspzrq3u.9090: Flags [.], ack 134, win 224, options [nop,nop,TS val 3539789845 ecr 2842719552], length 0
14:15:05.304194 IP 10.0.0.1.43922 > instance-cspzrq3u.9090: Flags [F.], seq 78, ack 134, win 224, options [nop,nop,TS val 3539789845 ecr 2842719552], length 0
14:15:05.304317 IP instance-cspzrq3u.9090 > 10.0.0.1.43922: Flags [F.], seq 134, ack 79, win 214, options [nop,nop,TS val 2842719586 ecr 3539789845], length 0
14:15:05.339035 IP 10.0.0.1.43922 > instance-cspzrq3u.9090: Flags [.], ack 135, win 224, options [nop,nop,TS val 3539789880 ecr 2842719586], length 0
如果要拆除这个vpn,只需在每个peer上分别执行如下命令:
$ sudo wg-quick down wg0
[#] ip link delete dev wg0
2. peer to the local network of other peer
上面两个peer虽然实现了点对点的连通,但是如果我们想从peer1访问peer2所在的局域网中的另外一台机器(这显然是vpn最常用的应用场景),如下面示意图:
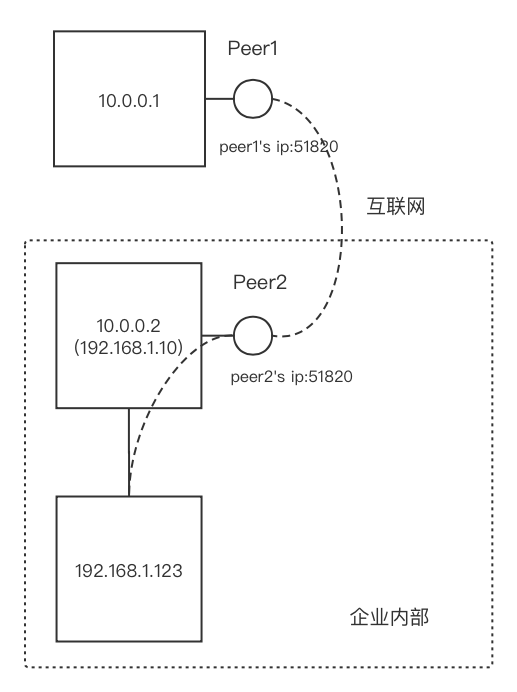
图:从一个peer到另外一个peer所在局域网的节点的通信图
基于目前的配置是否能实现呢?我们来试试。首先我们在peer1上要将192.168.1.0/24网段的路由指到wg0上,这样我们在peer1上ping或curl 192.168.1.123:9090,数据才能被交给wg0处理并通过vpn网络送出,修改peer1上的wg0.conf:
// peer1's /etc/wireguard/wg0.conf

... ...
[Peer]
PublicKey = {peer2's publickey}
EndPoint = peer2's ip:51820
AllowedIPs = 10.0.0.2/32,192.168.1.0/24
重启peer1上的wg0使上述配置生效。然后我们尝试在peer1上ping 192.168.1.123:
$ ping -c 3 192.168.1.123
PING 192.168.1.123 (192.168.1.123) 56(84) bytes of data.

--- 192.168.1.123 ping statistics ---
3 packets transmitted, 0 received, 100% packet loss, time 2038ms
我们在peer2上的tcpdump显示:
# tcpdump -i wg0
tcpdump: verbose output suppressed, use -v or -vv for full protocol decode
listening on wg0, link-type RAW (Raw IP), capture size 262144 bytes
14:33:38.393520 IP 10.0.0.1 > 192.168.1.123: ICMP echo request, id 30426, seq 1, length 64
14:33:39.408083 IP 10.0.0.1 > 192.168.1.123: ICMP echo request, id 30426, seq 2, length 64
14:33:40.432079 IP 10.0.0.1 > 192.168.1.123: ICMP echo request, id 30426, seq 3, length 64
我们看到peer2收到来自10.0.0.1的到192.168.1.123的ping包都没有对应的回包,通信失败。Why?我们分析一下。
peer2在51820端口收到WireGuard包后,去除wireguard包的包裹,露出真实数据包。真实数据包的目的ip地址为192.168.1.123,该地址并非peer2自身地址(其自身局域网地址为192.168.1.10)。既然不是自身地址,就不能送到上层协议栈(tcp)处理,那么另外一条路是forward(转发)出去。但是是否允许转发么?显然从结果来看,从wg0收到的消息无权转发,于是消息丢弃,这就是没有回包和通信失败的原因。
为了支持转发(这是vpn常用场景的功能哦),我们需要为peer2的wg0.conf增加些转发配置:
// peer2's  wg0.conf

[Interface]

... ...
PostUp   = iptables -A FORWARD -i %i -j ACCEPT; iptables -A FORWARD -o %i -j ACCEPT; iptables -t nat -A POSTROUT  ING -o eth0 -j MASQUERADE
PostDown = iptables -D FORWARD -i %i -j ACCEPT; iptables -D FORWARD -o %i -j ACCEPT; iptables -t nat -D POSTROUT  ING -o eth0 -j MASQUERADE

... ...
重启peer2的wg0。在peer2的内核层我们也要开启转发开关:
// /etc/sysctl.conf

net.ipv4.ip_forward=1

net.ipv6.conf.all.forwarding=1
执行下面命令临时生效:
# sysctl -p
net.ipv4.ip_forward = 1
net.ipv6.conf.all.forwarding = 1
接下来,我们再来测试一下连通性。我们在peer1上再次尝试ping 192.168.1.123:
$ ping -c 3 192.168.1.123
PING 192.168.1.123 (192.168.1.123) 56(84) bytes of data.
64 bytes from 192.168.1.123: icmp_seq=1 ttl=46 time=200 ms
64 bytes from 192.168.1.123: icmp_seq=2 ttl=46 time=200 ms
64 bytes from 192.168.1.123: icmp_seq=3 ttl=46 time=200 ms

--- 192.168.1.123 ping statistics ---
3 packets transmitted, 3 received, 0% packet loss, time 2002ms
rtt min/avg/max/mdev = 200.095/200.239/200.396/0.531 ms
这回通了!peer2上的Tcpdump输出中也看到了回包:
14:49:58.808467 IP 10.0.0.1 > 192.168.1.123: ICMP echo request, id 402, seq 1, length 64
14:49:58.974035 IP 192.168.1.123 > 10.0.0.1: ICMP echo reply, id 402, seq 1, length 64
14:49:59.809747 IP 10.0.0.1 > 192.168.1.123: ICMP echo request, id 402, seq 2, length 64
14:49:59.975240 IP 192.168.1.123 > 10.0.0.1: ICMP echo reply, id 402, seq 2, length 64
14:50:00.810802 IP 10.0.0.1 > 192.168.1.123: ICMP echo request, id 402, seq 3, length 64
14:50:00.976202 IP 192.168.1.123 > 10.0.0.1: ICMP echo reply, id 402, seq 3, length 64
我们在192.168.1.123上运行上面的那个httpserver程序,再在peer1上用curl访问这个程序:
$ curl 192.168.1.123:9090
hello, wireguard
我们看到httpserver的应答成功返回。peer2上的tcpdump也抓到了整个通信过程:
14:50:36.437259 IP 10.0.0.1.47918 > 192.168.1.123.9090: Flags [S], seq 3235649864, win 27600, options [mss 1380,sackOK,TS val 101915019 ecr 0,nop,wscale 7], length 0
14:50:36.593554 IP 192.168.1.123.9090 > 10.0.0.1.47918: Flags [S.], seq 2420552016, ack 3235649865, win 28960, options [mss 1460,sackOK,TS val 2323314775 ecr 101915019,nop,wscale 7], length 0
14:50:36.628315 IP 10.0.0.1.47918 > 192.168.1.123.9090: Flags [.], ack 1, win 216, options [nop,nop,TS val 101915210 ecr 2323314775], length 0
14:50:36.628379 IP 10.0.0.1.47918 > 192.168.1.123.9090: Flags [P.], seq 1:84, ack 1, win 216, options [nop,nop,TS val 101915210 ecr 2323314775], length 83
14:50:36.784550 IP 192.168.1.123.9090 > 10.0.0.1.47918: Flags [.], ack 84, win 227, options [nop,nop,TS val 2323314822 ecr 101915210], length 0
14:50:36.784710 IP 192.168.1.123.9090 > 10.0.0.1.47918: Flags [P.], seq 1:134, ack 84, win 227, options [nop,nop,TS val 2323314822 ecr 101915210], length 133
14:50:36.820339 IP 10.0.0.1.47918 > 192.168.1.123.9090: Flags [.], ack 134, win 224, options [nop,nop,TS val 101915401 ecr 2323314822], length 0
14:50:36.820383 IP 10.0.0.1.47918 > 192.168.1.123.9090: Flags [F.], seq 84, ack 134, win 224, options [nop,nop,TS val 101915401 ecr 2323314822], length 0
14:50:36.977226 IP 192.168.1.123.9090 > 10.0.0.1.47918: Flags [F.], seq 134, ack 85, win 227, options [nop,nop,TS val 2323314870 ecr 101915401], length 0
14:50:37.011927 IP 10.0.0.1.47918 > 192.168.1.123.9090: Flags [.], ack 135, win 224, options [nop,nop,TS val 101915594 ecr 2323314870], length 0
3. WireGuard的用户层实现
在linux上,我们务必使用WireGuard的内核模式,这显然是最高效的。在macOS、Windows上,WireGuard无法以内核模块驻留模式运行,但WireGuard项目提供了WireGuard的用户层实现。其作者Jason A. Donenfeld亲自实现了Go语言版本的wireguard-go。macOS上使用的就是wireguard的Go实现。我们可以使用brew在macOS上按照WireGuard:
$brew install wireguard-tools
配置好/etc/wireguard/wg0.conf后(和linux上的配置方式一致),同样可以通过wg-quick命令启动wireguard:
$sudo wg-quick up wg0
wg-quick实际上会通过wireguard-go来实现linux wireguard在内核中完成的功能:
$ps -ef|grep wireguard

    0 57783     1   0  3:18下午 ttys002    0:00.01 wireguard-go utun
三. WireGuard性能如何
关于WireGuard性能如何,官方给出了一个性能基准测试的对比数据(相较于其他vpn网络栈):

图:WireGuard性能与其他vpn网络栈的对比(来自官方截图)
我们看到和IPSec、OpenVPN相比,无论从吞吐还是延迟,WireGuard都领先不少。
我们这里用microsoft开源的带宽测试工具ethr来直观看一下走物理网络和走WireGuard VPN的带宽差别。
在peer2上运行:
$ ethr -s
然后在peer1上分别通过物理网络和VPN网络向peer2发起请求:
-
peer1 -> peer2 (物理网络)
$ ethr -c peer2’s ip Connecting to host [peer2 ip], port 9999 [ 6] local 172.21.0.5 port 46108 connected to peer2 ip port 9999
[ ID] Protocol Interval Bits/s [ 6] TCP 000-001 sec 1.54M [ 6] TCP 001-002 sec 1.54M [ 6] TCP 002-003 sec 1.54M [ 6] TCP 003-004 sec 1.54M [ 6] TCP 004-005 sec 1.54M
…. …
-
peer1 -> peer2 (vpn网络)
$ ethr -c 10.0.0.2 Connecting to host [10.0.0.2], port 9999 [ 6] local 10.0.0.1 port 36010 connected to 10.0.0.2 port 9999
[ ID] Protocol Interval Bits/s [ 6] TCP 000-001 sec 1.79M [ 6] TCP 001-002 sec 640K [ 6] TCP 002-003 sec 1.15M [ 6] TCP 003-004 sec 512K [ 6] TCP 004-005 sec 1.02M [ 6] TCP 005-006 sec 1.02M [ 6] TCP 006-007 sec 1.02M
我们看到走vpn的带宽相当于走物理网络的66%(1.02/1.54)左右。这里peer1(腾讯云)、peer2(百度云)之间走的是互联网,而在局域网测试的效果可能更好(留给大家^_^)。
四. 小结
经过上面的实验,我们看到了WireGuard的配置的确十分简单,这也是我目前使用过的配置过程最为简单的vpn。随着linux kernel 5.6内置对WireGuard的原生支持,WireGuard在vpn领域势必会有更为广泛的应用。
在容器网络方面,目前WireGuard已经给出了跨容器的网络通信方案,基于wireguard的k8s cni网络插件wormhole可以让pod之间通过wireguard实现的overlay网络通信。
国外的tailscale公司正在实现一种基于Wireguard的mesh vpn网络,该网络以WireGuard为数据平面的承载体,该公司主要实现控制平面。该公司目前聚集了一些Go核心开发人员,这里就包括著名的go核心开发团队成员、net/http包的最初作者和当前维护者的Brad Fitzpatrick。
五. 参考资料
-
WireGuard,简约之美 – https://zhuanlan.zhihu.com/p/91383212 原理说明,墙裂推荐!
-
虚拟专用网络 – https://baike.baidu.com/item/虚拟专用网络/8747869
-
How to easily configure WireGuard – https://www.stavros.io/posts/how-to-configure-wireguard/
-
WireGuard series – https://www.ericlight.com/wireguard-part-one-installation.html
我的网课“Kubernetes实战:高可用集群搭建、配置、运维与应用”在慕课网上线了,感谢小伙伴们学习支持!
我爱发短信:企业级短信平台定制开发专家 https://tonybai.com/
smspush : 可部署在企业内部的定制化短信平台,三网覆盖,不惧大并发接入,可定制扩展; 短信内容你来定,不再受约束, 接口丰富,支持长短信,签名可选。
著名云主机服务厂商DigitalOcean发布最新的主机计划,入门级Droplet配置升级为:1 core CPU、1G内存、25G高速SSD,价格5$/月。有使用DigitalOcean需求的朋友,可以打开这个链接地址:https://m.do.co/c/bff6eed92687 开启你的DO主机之路。
Gopher Daily(Gopher每日新闻)归档仓库 – https://github.com/bigwhite/gopherdaily
我的联系方式:
微博:https://weibo.com/bigwhite20xx
微信公众号:iamtonybai
博客:tonybai.com
github: https://github.com/bigwhite
微信赞赏:

商务合作方式:撰稿、出书、培训、在线课程、合伙创业、咨询、广告合作。