- 原weibo账号处于jy状态,临时先用小号 https://weibo.com/u/6484441286,欢迎大家关注!
- “Gopher部落”知识星球双十一新人特惠,领劵加入即享立减88元优惠 – https://t.zsxq.com/078E1QTjM
本文永久链接 – https://tonybai.com/2022/11/08/understand-go-context-by-example
自从context包在Go 1.7版本加入Go标准库,它就成为了Go标准库中较难理解和易误用的包之一。在我的博客中目前尚未有一篇系统介绍context包的文章,很多来自Go专栏或《Go语言精进之路》的读者都希望我能写一篇介绍context包的文章,今天我就来尝试一下^_^。
1. context包入标准库历程
2014年,Go团队核心成员Sameer Ajmani在Go官博上发表了一篇文章“Go Concurrency Patterns: Context”,介绍了Google内部设计和实现的一个名为context的包以及该包在Google内部实践后得出的一些应用模式。随后,该包被开源并放在golang.org/x/net/context下维护。两年后,也就是2016年,golang.org/x/net/context包正式被挪入Go标准库,这就是目前Go标准库context包的诞生历程。
历史经验告诉我们:但凡Google内部认为是好东西的,基本上最后都进入到Go语言或标准库当中了。context包就是其中之一,后续Go 1.9版本加入的type alias语法也印证了这一点。可以预测:即将于Go 1.20版本以实验特性身份加入的arena包离最终正式加入Go也只是时间问题了^_^!
2. context包解决的是什么问题?
正确定义问题比解决问题更重要。在Sameer Ajmani的文章中,他在一开篇就对引入context包要解决的问题做了明确的阐述:
在Go服务器中,每个传入的请求都在自己的goroutine中处理。请求的处理程序经常启动额外的goroutine来访问后端服务,如数据库和RPC服务。处理一个请求的一组goroutine通常需要访问该请求相关的特定的值,比如最终用户的身份、授权令牌和请求的deadline等。当一个请求被取消或处理超时时,所有在该请求上工作的goroutines应该迅速退出,以便系统可以回收他们正在使用的任何资源。
从这段描述中,我至少get到两点:
- 传值
后端服务程序有这样的需求,即在处理某请求的函数(Handler Function)中调用其他函数时,传递与请求相关的(request-specific)、请求内容之外的值信息(以下称之为上下文中的值信息),如下图所示:

我们看到:这种函数调用以及传值可以发生在同一goroutine的函数之间(比如上图中的Handler函数调用middleware函数)、同一进程的多个goroutine之间(如被调用函数创建了新的goroutine),甚至是不同进程的goroutine之间(比如rpc调用)。
- 控制
同一goroutine下因处理外部请求(request)而发生函数调用时,如果被调用的函数(callee)并没有启动新goroutine或进行跨进程的处理(如rpc调用),这时更多的是在函数间传值,即传递上下文中的值信息。
但当被调用的函数(callee)启动新goroutine或进行跨进程处理时,这通常会是一种异步调用。为什么要启动新goroutine进行异步调用呢?更多是为了控制。如果是同步调用,一旦被调用方出现延迟或故障,这次调用很可能长期阻塞,调用者自身既无法消除这种影响,也不能及时回收掉处理这次请求所申请的各种资源,更无法保证服务接口之间的SLA。
注意:调用者与被调用者之间可以是同步调用,也可以是异步调用,而被调用者则通常启动新的goroutine来实现一种“异步调用”。
那么怎么控制异步调用呢?这回我们在调用者与被调用者之间传递的不再是一种值信息,而是一种“默契”,即一种控制机制,如下图所示:
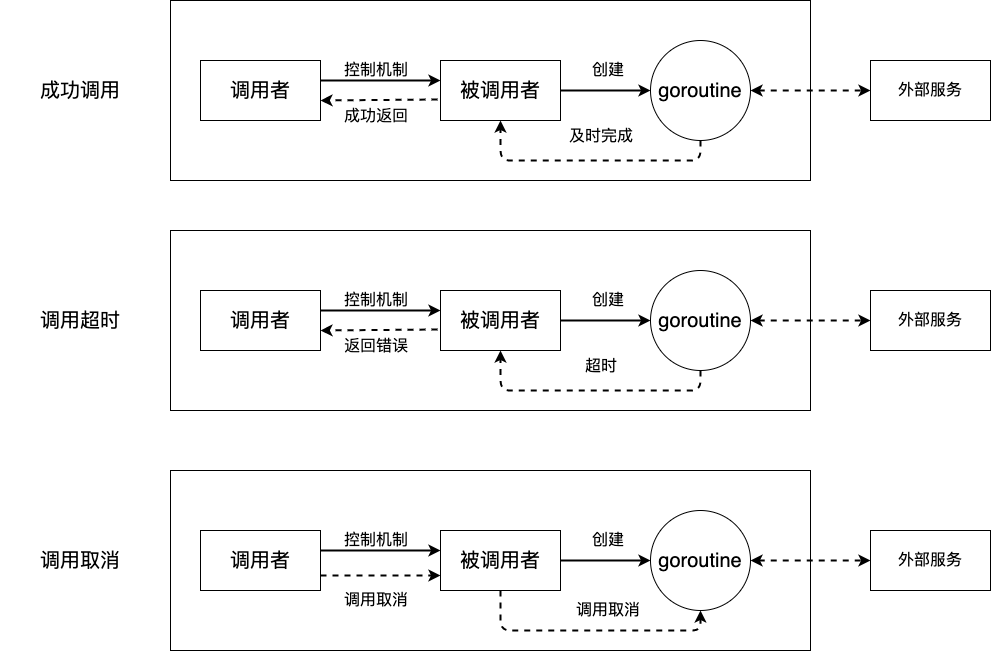
当被调用者在调用者的限定时间内完成任务,调用成功,被调用者释放所有资源;当被调用者无法在限定时间内完成或被调用者收到调用者取消调用的通知时,也能结束调用并释放资源。
接下来,我们就来看看Go标准库context包是如何解决上述两个问题的。
3. context包的构成
Go将对上面两个问题“传值与控制”的解决方案统一放到了context包下的一个名为Context接口类型中了:
// $GOROOT/src/context/context.go
type Context interface {
    Deadline() (deadline time.Time, ok bool)
    Done() <-chan struct{}
    Err() error
    Value(key any) any
}
注:“上下文”本没有统一标准,很多第三方包也有自己Context的定义,但Go 1.7之后都逐渐转为使用Go标准库的context.Context了。
如果你读懂了前面context包要解决的问题,你大致也能将Context接口类型中的方法分为两类,第一类就是Value方法,用于解决“传值”的问题;其他三个方法(Deadline、Done和Err)划归为第二类,用于解决“传递控制”的问题。
如果仅仅是定义Context这样一个接口类型,统一了对Context的抽象,那事情就未得到彻底解决(但也比log包做的要好了),Go context包“好人做到底”,还提供了一系列便利的函数以及若干内置的Context接口的实现。下面我们逐一来看一下。
1) WithValue函数
首先我们看一下用于传值的WithValue函数。
// $GOROOT/src/context/context.go
func WithValue(parent Context, key, val any) Context
WithValue函数基于parent Context创建一个新的Context,这个新的Context既保存了一份parent Context的副本,同时也保存了WithValue函数接受的那个key-val对。 WithValue其实返回一个名为*valueCtx类型的实例,*valueCtx实现了Context接口,它由三个字段组成:
// $GOROOT/src/context/context.go

type valueCtx struct {
    Context
    key, val any
}
结合WithValue的实现逻辑,valueCtx中的Context被赋值为parent Context,key和val分别保存了WithValue传入的key和val。
在新Context创建成功后,处理函数后续将基于该新Context进行上下文中的值信息的传递,我们来看一个例子:
// github.com/bigwhite/experiments/tree/master/context-examples/with_value/main.go

package main

import (
    "context"
    "fmt"
)

func f3(ctx context.Context, req any) {
    fmt.Println(ctx.Value("key0"))
    fmt.Println(ctx.Value("key1"))
    fmt.Println(ctx.Value("key2"))
}

func f2(ctx context.Context, req any) {
    ctx2 := context.WithValue(ctx, "key2", "value2")
    f3(ctx2, req)
}

func f1(ctx context.Context, req any) {
    ctx1 := context.WithValue(ctx, "key1", "value1")
    f2(ctx1, req)
}

func handle(ctx context.Context, req any) {
    ctx0 := context.WithValue(ctx, "key0", "value0")
    f1(ctx0, req)
}

func main() {
    rootCtx := context.Background()
    handle(rootCtx, "hello")
}
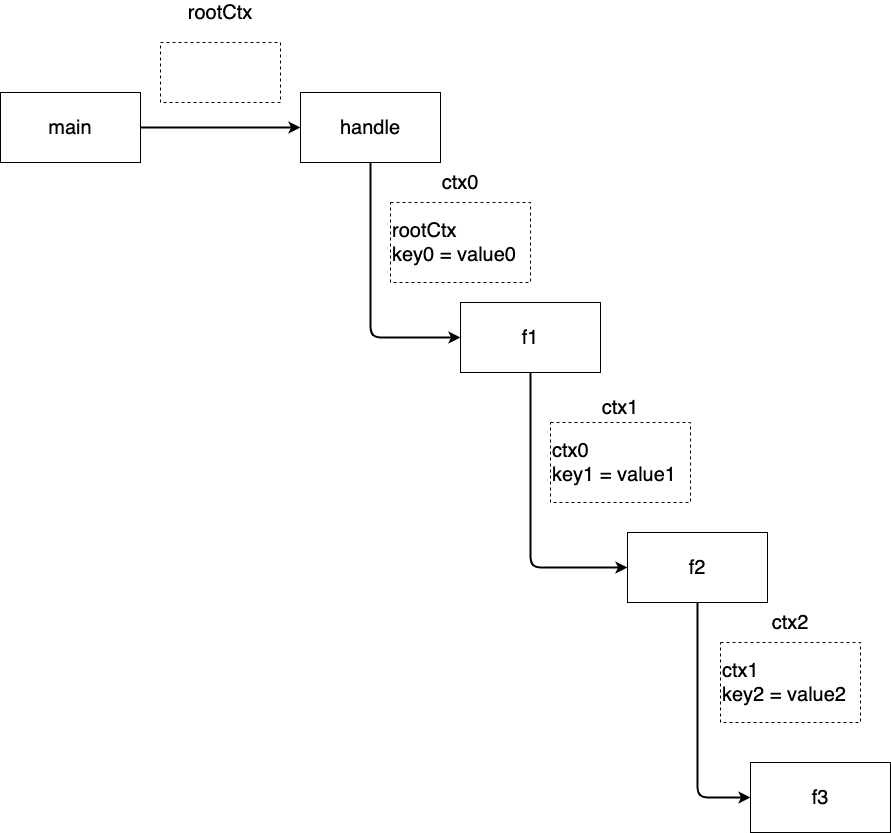
在上面这段代码中,handle是负责处理“请求”的入口函数,它接受一个由main函数创建的root Context以及请求内容本身(“hello”),之后handle函数基于传入的ctx,通过WithValue函数创建了一个包含了自己附加的key0-value0对的新Context,这个新Context将在调用f1函数时作为上下文传给f1;依次类推,f1、f2都基于传入的ctx通过WithValue函数创建了包含自己附加的值信息的新Context,在函数调用链的末端,f3通过Context的Value方法从传入的ctx中尝试取出上下文中的各种值信息,我们用一幅示意图来展示一下这个过程:
我们运行一下上述代码看看结果:
$go run main.go
value0
value1
value2
我们看到,f3不仅从上下文中取出了f2附加的key2-value2,还可以取出handle、f1等函数附加的值信息。这得益于满足Context接口的*valueCtx类型“顺藤摸瓜”的实现:
// $GOROOT/src/context/context.go

func (c *valueCtx) Value(key any) any {
    if c.key == key {
        return c.val
    }
    return value(c.Context, key)
}

func value(c Context, key any) any {
    for {
        switch ctx := c.(type) {
        case *valueCtx:
            if key == ctx.key {
                return ctx.val
            }
            c = ctx.Context
        case *cancelCtx:
            if key == &cancelCtxKey {
                return c
            }
            c = ctx.Context
        case *timerCtx:
            if key == &cancelCtxKey {
                return &ctx.cancelCtx
            }
            c = ctx.Context
        case *emptyCtx:
            return nil
        default:
            return c.Value(key)
        }
    }
}
我们看到在*valueCtx case中,如果key与当前ctx的key不同,就会继续沿着parent Ctx路径继续查找,直到找到为止。
我们看到:WithValue用起来不难,也好理解。不过由于每个valueCtx仅能保存一对key-val,这样即便在一个函数中添加多个值信息,其使用模式也必须是这样的:
ctx1 := WithValue(parentCtx, key1, val1)
ctx2 := WithValue(ctx1, key2, val2)
ctx3 := WithValue(ctx2, key3, val3)
nextCall(ctx3, req)
而不能是
ctx1 := WithValue(parentCtx, key1, val1)
ctx1 = WithValue(parentCtx, key2, val2)
ctx1 = WithValue(parentCtx, key3, val3)
nextCall(ctx1, req)
否则ctx1中仅会保存最后一次的key3-val3的信息,而key1、key2都会被覆盖掉。
valueCtx的这种设计也导致了Value方法的查找key的效率不是很高,是个O(n)的查找。在一些对性能敏感的Web框架中,valueCtx和WithValue可能难有用武之地。
在上面的例子中,我们说到了root Context,下面简单说一下root Context的构建。
2) root Context构建
root Context,也称为top-level Context,即最顶层的Context,通常在main函数、初始化函数、请求处理的入口(某个Handle函数)中创建。 Go提供了两种root Context的构建方法Background和TODO:
// $GOROOT/src/context/context.go

var (
    background = new(emptyCtx)
    todo       = new(emptyCtx)
)

func Background() Context {
    return background
}

func TODO() Context {
    return todo
}
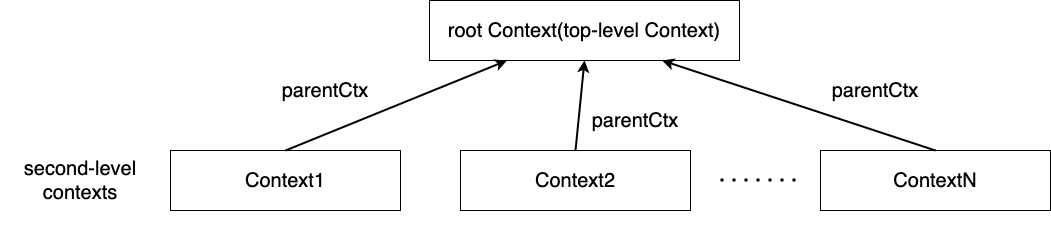
我们看到,虽然标准库提供了两种root Context的创建方法,但它们本质是一样的,底层都返回的是一个与程序同生命周期的emptyCtx类型的实例。有小伙伴可能会问:Go所有代码共享一个root Context会不会有问题呢?
答案是不会!因为root Context啥“实事”也不做,就像“英联邦国王”一样,仅具有名义上的象征意义,它既不会存储上下文值信息,也不会携带上下文控制信息,整个生命周期内它都不会被改变。它只是作为二级上下文parent Context的指向,真正具有“功能”作用的Context是类似于首相或总理的second-level Context:
通常我们都会使用Background()函数构造root Context,而按照context包TODO函数的注释来看,TODO仅在不清楚应该使用哪个Context的情况下临时使用。
3) WithCancel函数
WithCancel函数为上下文提供了第一种控制机制:可取消(cancel),它也是整个context包控制机制的基础。我们先直观感受一下WithCancel的作用,下面是Go context包文档中的一个例子:
package main

import (
    "context"
    "fmt"
)

func main() {
    gen := func(ctx context.Context) <-chan int {
        dst := make(chan int)
        n := 1
        go func() {
            for {
                select {
                case <-ctx.Done():
                    return // returning not to leak the goroutine
                case dst <- n:
                    n++
                }
            }
        }()
        return dst
    }

    ctx, cancel := context.WithCancel(context.Background())
    defer cancel() // cancel when we are finished consuming integers

    for n := range gen(ctx) {
        fmt.Println(n)
        if n == 5 {
            break
        }
    }
}
在这个例子,main函数通过WithCancel创建了一个具有可取消属性的Context实例,然后在调用gen函数时传入了该实例。WithCancel函数除了返回一个具有可取消属性的Context实例外,还返回了一个cancelFunc,这个cancelFunc就是握在调用者手里的那个“按钮”,一旦按下该“按钮”,即调用者发出“取消”信号,异步调用中启动的goroutine就应该放下手头工作,老老实实地退出。
就像上面这个示例一样,main函数将cancel Context传给gen后,gen函数启动了一个新goroutine用于生成一组数列,而main函数则从gen返回的channel中读取这些数列中的数。main函数在读完第5个数字后,按下了“按钮”,即调用了cancel Function。这时那个生成数列的goroutine会监听到Done channel有事件,然后完成goroutine的退出。
这就是前面说过的那种调用者和被调用者(以及调用者创建的新goroutine)之间应具备的那种“默契”,这种“默契”要求两者都要基于上下文按一定的“套路”进行处理,在这个例子中就体现在调用者适时调用cancel Function,而gen启动的goroutine要监听可取消Context实例的Done channel。
并且通常,我们在创建完一个cancel Context后,立即会通过defer将cancel Function注册到deferred function stack中去,以防止因未调用cancel Function导致的资源泄露!在这个例子中,如果不调用cancel Function,gen函数创建的那个goroutine就会一直运行,虽然它生成的数字已经不会再有其他goroutine消费。
相较于WithValue函数,WithCancel的实现略复杂:
// $GOROOT/src/context/context.go

func WithCancel(parent Context) (ctx Context, cancel CancelFunc) {
    if parent == nil {
        panic("cannot create context from nil parent")
    }
    c := newCancelCtx(parent)
    propagateCancel(parent, &c)
    return &c, func() { c.cancel(true, Canceled) }
}

func newCancelCtx(parent Context) cancelCtx {
    return cancelCtx{Context: parent}
}
其复杂就复杂在propagateCancel这个调用上:
// propagateCancel arranges for child to be canceled when parent is.
func propagateCancel(parent Context, child canceler) {
    done := parent.Done()
    if done == nil {
        return // parent is never canceled
    }

    select {
    case <-done:
        // parent is already canceled
        child.cancel(false, parent.Err())
        return
    default:
    }

    if p, ok := parentCancelCtx(parent); ok {
        p.mu.Lock()
        if p.err != nil {
            // parent has already been canceled
            child.cancel(false, p.err)
        } else {
            if p.children == nil {
                p.children = make(map[canceler]struct{})
            }
            p.children[child] = struct{}{}
        }
        p.mu.Unlock()
    } else {
        atomic.AddInt32(&goroutines, +1)
        go func() {
            select {
            case <-parent.Done():
                child.cancel(false, parent.Err())
            case <-child.Done():
            }
        }()
    }
}
propagateCancel通过parentCancelCtx向上顺着parent路径查找,之所以可以这样,是因为Value方法具备沿着parent路径查找的特性:
func parentCancelCtx(parent Context) (*cancelCtx, bool) {
    done := parent.Done()
    if done == closedchan || done == nil {
        return nil, false
    }
    p, ok := parent.Value(&cancelCtxKey).(*cancelCtx) // 沿着parent路径查找第一个cancelCtx
    if !ok {
        return nil, false
    }
    pdone, _ := p.done.Load().(chan struct{})
    if pdone != done {
        return nil, false
    }
    return p, true
}
如果找到一个cancelCtx,就将自己加入到该cancelCtx的child map中:
type cancelCtx struct {
    Context

    mu       sync.Mutex            // protects following fields
    done     atomic.Value          // of chan struct{}, created lazily, closed by first cancel call
    children map[canceler]struct{} // set to nil by the first cancel call
    err      error                 // set to non-nil by the first cancel call
}
注:接口类型值是支持比较的,如果两个接口类型值的动态类型相同且动态类型的值相同,那么两个接口类型值就相同。这也是children这个map用canceler接口作为key的原因。
这样当其parent cancelCtx的cancel Function被调用时,cancel function会调用cancelCtx的cancel方法,cancel方法会遍历所有children cancelCtx,然后调用child的cancel方法以达到关联取消的目的,同时该parent cancelCtx会与所有children cancelCtx解除关系!
func (c *cancelCtx) cancel(removeFromParent bool, err error) {
    if err == nil {
        panic("context: internal error: missing cancel error")
    }
    c.mu.Lock()
    if c.err != nil {
        c.mu.Unlock()
        return // already canceled
    }
    c.err = err
    d, _ := c.done.Load().(chan struct{})
    if d == nil {
        c.done.Store(closedchan)
    } else {
        close(d)
    }
    for child := range c.children { // 遍历children,调用cancel方法
        // NOTE: acquiring the child's lock while holding parent's lock.
        child.cancel(false, err)
    }
    c.children = nil // 解除与children的关系
    c.mu.Unlock()

    if removeFromParent {
        removeChild(c.Context, c)
    }
}
我们用一个例子来演示一下:
// github.com/bigwhite/experiments/tree/master/context-examples/with_cancel/cancelctx_map.go

package main

import (
    "context"
    "fmt"
    "time"
)

// 直接使用parent cancelCtx
func f1(ctx context.Context) {
    go func() {
        select {
        case <-ctx.Done():
            fmt.Println("goroutine created by f1 exit")
        }
    }()
}

// 基于parent cancelCtx创建新的cancelCtx
func f2(ctx context.Context) {
    ctx1, _ := context.WithCancel(ctx)
    go func() {
        select {
        case <-ctx1.Done():
            fmt.Println("goroutine created by f2 exit")
        }
    }()
}

// 使用基于parent cancelCtx创建的valueCtx
func f3(ctx context.Context) {
    ctx1 := context.WithValue(ctx, "key3", "value3")
    go func() {
        select {
        case <-ctx1.Done():
            fmt.Println("goroutine created by f3 exit")
        }
    }()
}

// 基于parent cancelCtx创建的valueCtx之上创建cancelCtx
func f4(ctx context.Context) {
    ctx1 := context.WithValue(ctx, "key4", "value4")
    ctx2, _ := context.WithCancel(ctx1)
    go func() {
        select {
        case <-ctx2.Done():
            fmt.Println("goroutine created by f4 exit")
        }
    }()
}

func main() {
    valueCtx := context.WithValue(context.Background(), "key0", "value0")
    cancelCtx, cf := context.WithCancel(valueCtx)
    f1(cancelCtx)
    f2(cancelCtx)
    f3(cancelCtx)
    f4(cancelCtx)

    time.Sleep(3 * time.Second)
    fmt.Println("cancel all by main")
    cf()
    time.Sleep(10 * time.Second) // wait for log output
}
上面这个示例演示了四种情况:
- f1: 直接使用parent cancelCtx
- f2: 基于parent cancelCtx创建新的cancelCtx
- f3: 使用基于parent cancelCtx创建的valueCtx
- f4: 使用基于parent cancelCtx创建的valueCtx之上创建的cancelCtx
运行这个示例,我们得到:
cancel all by main
goroutine created by f1 exit
goroutine created by f2 exit
goroutine created by f3 exit
goroutine created by f4 exit
我们看到,无论是直接使用parent cancelCtx,还是使用基于parent cancelCtx创建的其他各种Ctx,当parent cancelCtx的cancel Function被调用后,所有监听对应child Done channel的goroutine都能正确收到通知并退出。
当然这种“取消通知”只能由parent通知到下面的children,反过来则不行,parent cancelCtx不会因为child Context的cancel function被调用而被cancel掉。另外如果某个children cancelCtx的cancel Function被调用后,该children会与其parent cancelCtx解绑。
在前面贴出的propagateCancel函数的实现中,我们还看到了另外一个分支,即parentCancelCtx函数返回的ok为false时,propagateCancel函数会启动一个新的goroutine监听parent Done channel和自身的Done channel。什么情况下会走到这个执行分支下呢?这种情况似乎不多!我们来看一个自定义cancelCtx的情况:
package main

import (
    "context"
    "fmt"
    "runtime"
    "time"
)

func f1(ctx context.Context) {
    ctx1, _ := context.WithCancel(ctx)
    go func() {
        select {
        case <-ctx1.Done():
            fmt.Println("goroutine created by f1 exit")
        }
    }()
}

type myCancelCtx struct {
    context.Context
    done chan struct{}
    err  error
}

func (ctx *myCancelCtx) Done() <-chan struct{} {
    return ctx.done
}

func (ctx *myCancelCtx) Err() error {
    return ctx.err
}

func WithMyCancelCtx(parent context.Context) (context.Context, context.CancelFunc) {
    var myCtx = &myCancelCtx{
        Context: parent,
        done:    make(chan struct{}),
    }

    return myCtx, func() {
        myCtx.done <- struct{}{}
        myCtx.err = context.Canceled
    }
}

func main() {
    valueCtx := context.WithValue(context.Background(), "key0", "value0")
    fmt.Println("before f1:", runtime.NumGoroutine())

    myCtx, mycf := WithMyCancelCtx(valueCtx)
    f1(myCtx)
    fmt.Println("after f1:", runtime.NumGoroutine())

    time.Sleep(3 * time.Second)
    mycf()
    time.Sleep(10 * time.Second) // wait for log output
}
在这个例子中,我们“部分逃离”了context cancelCtx的体系并自定义了一个实现了Context接口的myCancelCtx,在这样的情况下,当f1函数基于myCancelCtx构建自己的child CancelCtx时,由于向上找不到*cancelCtx类型,所以它WithCancel启动了一个goroutine既监听自己的Done channel,也监听其parent Ctx(即myCancelCtx)的Done channel。
当myCancelCtx的cancel Function在main函数中被调用时(mycf()),新建的goroutine会调用child的cancel函数实现操作取消。运行上面示例,我们得到如下结果:
$go run custom_cancelctx.go
before f1: 1
after f1: 3  // 在context包中新创建了一个goroutine
goroutine created by f1 exit
由此,我们看到,除了“业务”层面可能导致的资源泄露之外,cancel Context的实现中也会有一些资源(比如上面这个新建的goroutine)需要及时释放,否则也会导致“泄露”。
一些小伙伴可能会问这样一个问题:在被调用函数(callee)中,到底是继续传递原cancelCtx给新建的goroutine,还是基于parent cancelCtx创建一个新的cancelCtx再传给goroutine用呢?这让我想起了装修时遇到的一个问题:是否在水管某些地方加阀门?
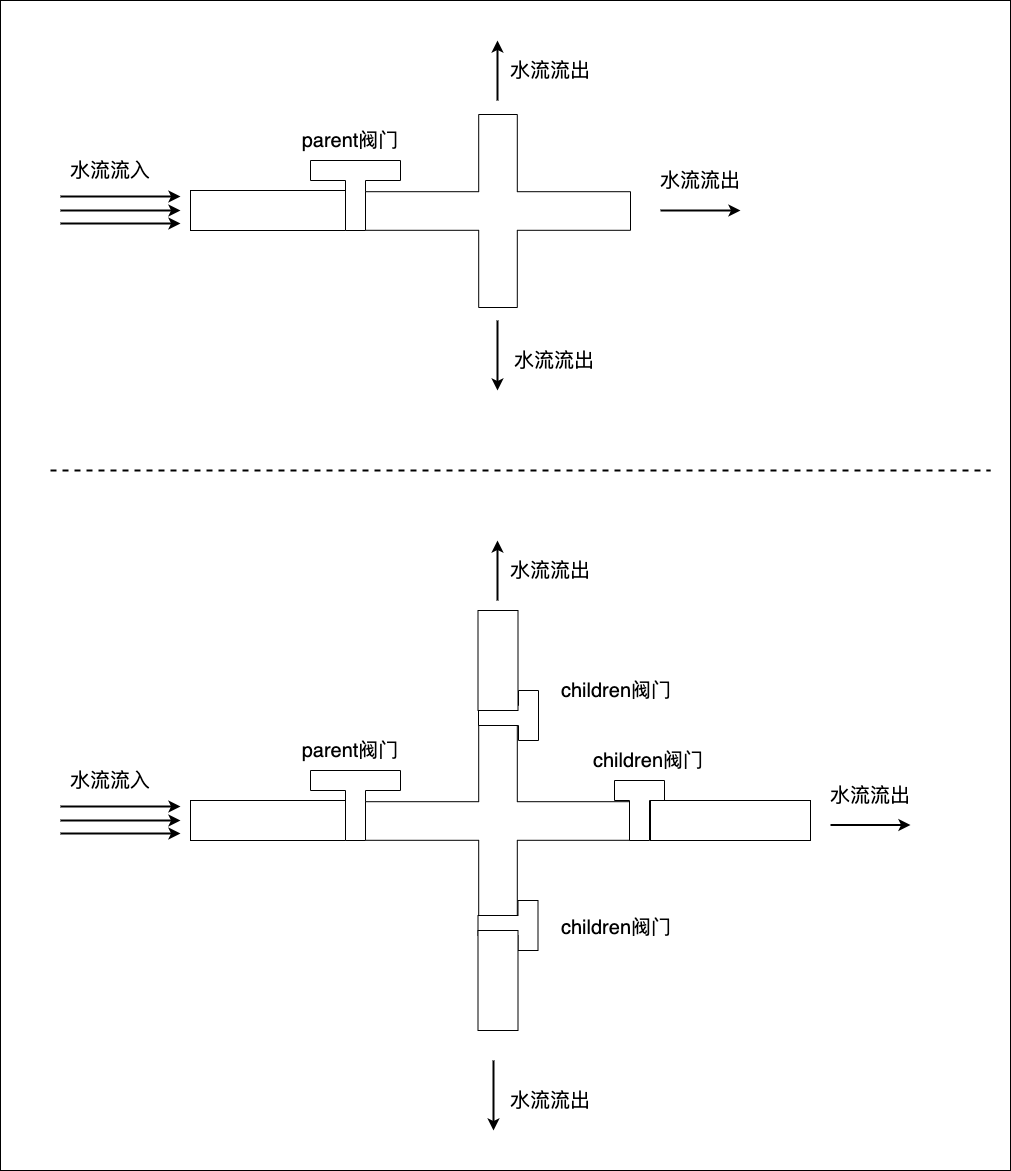
加上阀门,可以单独控制一路的关闭!同样在代码中,基于parent cancelCtx创建新的cancelCtx可以做单独取消操作,而不影响parentCtx,这就看业务层代码是否需要这么做了。
到这里,我们已经get到了context包提供的取消机制,但实际中,我们很难拿捏好cancel Function调用的时机。为此,context包提供了另外一个建构在cancelCtx之上的实用控制机制:timerCtx。接下来,我们就来看看timerCtx。
4) WithDeadline和WithTimeout函数
timerCtx基于cancelCtx提供了一种基于deadline的取消控制机制:
type timerCtx struct {
    cancelCtx
    timer *time.Timer // Under cancelCtx.mu.

    deadline time.Time
}
context包提供了两个创建timerCtx的API:WithDeadline和WithTimeout函数:
// $GOROOT/src/context/context.go

func WithDeadline(parent Context, d time.Time) (Context, CancelFunc) {
    if parent == nil {
        panic("cannot create context from nil parent")
    }
    if cur, ok := parent.Deadline(); ok && cur.Before(d) {
        // The current deadline is already sooner than the new one.
        return WithCancel(parent)
    }
    c := &timerCtx{
        cancelCtx: newCancelCtx(parent),
        deadline:  d,
    }
    propagateCancel(parent, c)
    dur := time.Until(d)
    if dur <= 0 {
        c.cancel(true, DeadlineExceeded) // deadline has already passed
        return c, func() { c.cancel(false, Canceled) }
    }
    c.mu.Lock()
    defer c.mu.Unlock()
    if c.err == nil {
        c.timer = time.AfterFunc(dur, func() {
            c.cancel(true, DeadlineExceeded)
        })
    }
    return c, func() { c.cancel(true, Canceled) }
}

func WithTimeout(parent Context, timeout time.Duration) (Context, CancelFunc) {
    return WithDeadline(parent, time.Now().Add(timeout))
}
从实现来看,WithTimeout就是WithDeadline的再包装!我们弄懂WithDeadline即可。从WithDeadline的实现来看,该函数通过time.AfterFunc设置了一个定时器,定时器fire后的执行逻辑就是执行该ctx的cancel Function。也就是说timerCtx既支持手工cancel(原cancelCtx的机制),也支持定时cancel,并且通常由定时器来完成cancel。
有了cancelCtx的基础,timerCtx就不难理解了。不要要注意的一点时,即便有了定时器来cancel操作,我们也不要忘记显式调用WithDeadline和WithTimeout返回的cancel function,及早释放资源不是更好么!
4. 小结
本文对Go标准库context包要解决的问题、context包构成以及传值和传递控制的原理做了简要讲解,相信读完这些内容后,你再回头去看你写过的运用context包的代码肯定会有更为深刻的理解。
context包目前在Go生态内得到广泛应用,较为典型的是在http handler中传递值信息、在tracing框架中通过在上下文中的trace ID来整合tracing信息等。
Go社区对context包的声音也不全是正面,其中context.Context具有“病毒般”的传染性就是被集中诟病的方面。Go官方也有一个issue记录了Go社区对context包的反馈和优化建议,有兴趣的小伙伴可以去翻翻。
本文的context包源码来自Go 1.19.1版本,与老版本Go或Go的未来版本可能会有差别。
本文的源码在这里可以下载。
5. 参考资料
- context包文档手册 – https://pkg.go.dev/context
- Go Concurrency Patterns: Context – https://go.dev/blog/context
“Gopher部落”知识星球旨在打造一个精品Go学习和进阶社群!高品质首发Go技术文章,“三天”首发阅读权,每年两期Go语言发展现状分析,每天提前1小时阅读到新鲜的Gopher日报,网课、技术专栏、图书内容前瞻,六小时内必答保证等满足你关于Go语言生态的所有需求!2022年,Gopher部落全面改版,将持续分享Go语言与Go应用领域的知识、技巧与实践,并增加诸多互动形式。欢迎大家加入!


我爱发短信:企业级短信平台定制开发专家 https://tonybai.com/。smspush : 可部署在企业内部的定制化短信平台,三网覆盖,不惧大并发接入,可定制扩展; 短信内容你来定,不再受约束, 接口丰富,支持长短信,签名可选。2020年4月8日,中国三大电信运营商联合发布《5G消息白皮书》,51短信平台也会全新升级到“51商用消息平台”,全面支持5G RCS消息。
著名云主机服务厂商DigitalOcean发布最新的主机计划,入门级Droplet配置升级为:1 core CPU、1G内存、25G高速SSD,价格5$/月。有使用DigitalOcean需求的朋友,可以打开这个链接地址:https://m.do.co/c/bff6eed92687 开启你的DO主机之路。
Gopher Daily(Gopher每日新闻)归档仓库 – https://github.com/bigwhite/gopherdaily
我的联系方式:
- 微博:https://weibo.com/bigwhite20xx
- 博客:tonybai.com
- github: https://github.com/bigwhite

商务合作方式:撰稿、出书、培训、在线课程、合伙创业、咨询、广告合作。