当初Kubernetes网络的设计目标是使得开发者使用pod时在网络这一层面可以像使用传统物理主机或虚拟机一样。具体的基本要求如下:
- 所有pod间均应可以在无需NAT的情况下直接通信;
- 所有集群节点与所有集群的Pod之间均应可以在无需NAT的情况下直接通信;
- 容器自身的地址和其他pod看到的它的地址是同一个地址;
按照这样的要求,集群中的每个pod都在一个平坦的、共享网络命名空间中,并且每个Pod都拥有一个IP,通信时无需端口映射。 用户也需要额外考虑如何建立Pod之间的连接,也不需要考虑将容器端口映射到主机端口等问题。基于这些要求而实现的k8s pod网络模型,将具有向后兼容的特性,可以使得Pod从某些角度上可以被看成是一个传统的物理主机或vm来对待。
在《使用nomad实现集群管理和微服务部署调度》一文中,我们看到nomad部署调度的driver为docker的服务实例都是通过主机和容器间的端口映射来对外提供服务的。服务实例多的时候,大量服务端口出现在眼前,我们很难用端口判断这是什么服务。并且通过映射端口暴露服务有局限,对于那些需要映射到主机固定端口的服务来说,很可能存在与其他服务的端口冲突而导致部署失败。除此之外,这种端口映射的方式还缺少隔离的作用,所有实例暴露的端口在同一个全局网络空间。
nomad是否可以像k8s一样将服务实例部署到overlay网络中从而实现每个服务实例所在container可以被看成一个独立的vm;并且我们还可以通过划分overlay的网段来隔离,实现某种意义上的“多租户”呢?在本篇文章中,我们来试验一下上述想法是否可行。
一、搭建试验环境
我们这次在一个VirtualBox搭建的三节点环境中进行验证。如果小伙伴对这段很熟悉,或者有现成的环境可用,那么可以跳过这一小节。另外这节不是重点,我不会对这个过程用过多文字做解释。
1. 创建虚机,组建网络
我们在一台ubuntu 18.04 desktop版本主机上搭建环境,所使用的软件版本信息如下:
-
VirtualBox: 5.2.18
-
Guest OS: Ubuntu 16.04.6 LTS (GNU/Linux 4.4.0-142-generic x86_64)
组件环境的虚拟机和网络拓扑示意图如下:
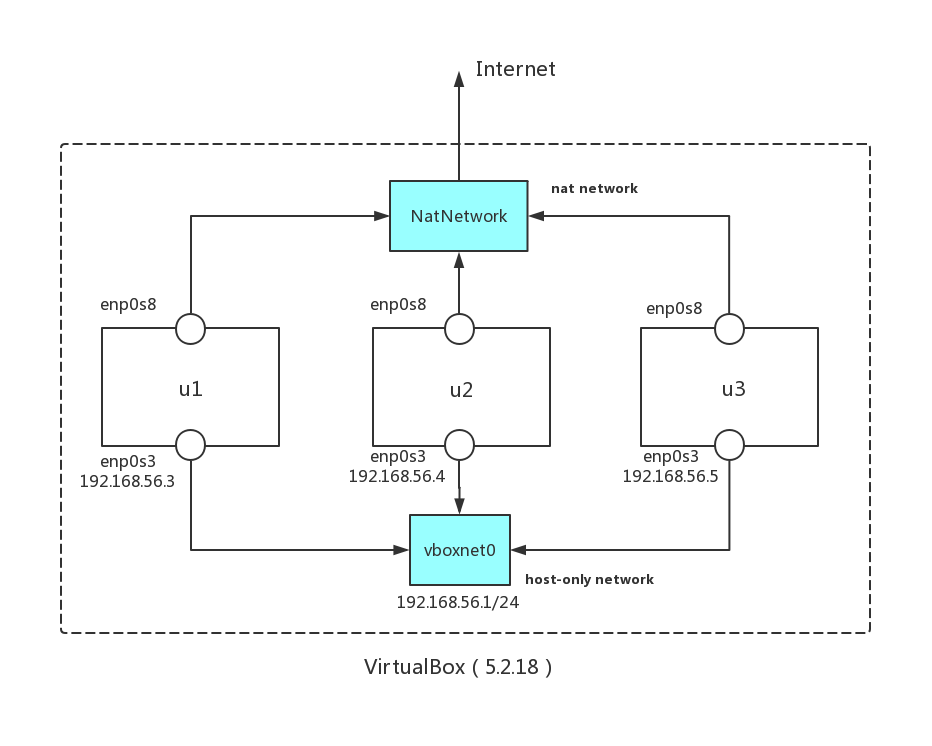
如上图所示:三个vm 通过连入host-only网络(vboxnet0)实现内网通;通过连入NAT网络(NatNetwork)实现外网通。(怪异:在windows上的virtualbox实际上通过natnetwork即可实现全通的,无需host-only network,但是在ubuntu下居然不行)。
每个vm中网络配置如下:
# cat /etc/network/interfaces

# This file describes the network interfaces available on your system
# and how to activate them. For more information, see interfaces(5).

source /etc/network/interfaces.d/*

# The loopback network interface
auto lo
iface lo inet loopback

# The primary network interface
auto enp0s3
iface enp0s3 inet dhcp

auto enp0s8
iface enp0s8 inet dhcp
保存后,执行/etc/init.d/networking restart生效。
另外每个vm上安装了openssh-server(apt install openssh-server)并设置root可登陆。三个vm的主机名分为为u1、u2和u3(可通过hostnamectl –static set-hostname u1设置。并在/etc/hosts中添加主机名和内网IP的对应关系)。
每台主机上安装了docker引擎(通过apt install docker.io安装),docker版本信息如下:
# docker version
Client:
 Version:           18.09.2
 API version:       1.39
 Go version:        go1.10.4
 Git commit:        6247962
 Built:             Tue Feb 26 23:56:24 2019
 OS/Arch:           linux/amd64
 Experimental:      false

Server:
 Engine:
  Version:          18.09.2
  API version:      1.39 (minimum version 1.12)
  Go version:       go1.10.4
  Git commit:       6247962
  Built:            Tue Feb 12 22:47:29 2019
  OS/Arch:          linux/amd64
  Experimental:     false
二、使用weave创建跨节点的overlay network
我们选择weave作为overlay network的实现。
1. 安装weave
我们在每个vm节点上安装目前最新版本的weave,以一个节点为例:
# curl -L git.io/weave -o /usr/local/bin/weave
  % Total    % Received % Xferd  Average Speed   Time    Time     Time  Current
                                 Dload  Upload   Total   Spent    Left  Speed
  0     0    0     0    0     0      0      0 --:--:--  0:00:01 --:--:--     0
  0     0    0     0    0     0      0      0 --:--:--  0:00:02 --:--:--     0
100   595    0   595    0     0     62      0 --:--:--  0:00:09 --:--:--   137
100 52227  100 52227    0     0   4106      0  0:00:12  0:00:12 --:--:-- 21187

# chmod a+x /usr/local/bin/weave

# weave version
weave script 2.5.1

... ...
通过weave setup预先将weave相关的容器Image下载到各个节点,为后面的weave launch所使用。
# weave setup

2.5.1: Pulling from weaveworks/weave
... ...
c458f7a37ca6: Pull complete
Digest: sha256:a170dd93fa7e678cc37919ffd65601d1015da6c3f10878534ac237381ea0db19
Status: Downloaded newer image for weaveworks/weave:2.5.1
2.5.1: Pulling from weaveworks/weaveexec
... ...
c11f30d06b58: Pull complete
Digest: sha256:ad53aaabf648548ec26cceac3ab49394778322e1623f0d184a2b74ad06338087
Status: Downloaded newer image for weaveworks/weaveexec:2.5.1
latest: Pulling from weaveworks/weavedb
9b0681f946a1: Pull complete
Digest: sha256:c280cf4e7208f4ca0d2514539e0f476dd12db70beacdc368793b7736de023d8d
Status: Downloaded newer image for weaveworks/weavedb:latest
2. 启动跨多节点(peer) weave network
weave的一个优点是建立跨节点overlay network时并不需要一个外部的存储(比如etcd),位于多个节点上的weave进程会自动同步相关信息。而且weave支持动态向weave overlay network中添加节点。
我们来初始化这个由三个vm节点构成的weave overlay network:
root@u1:~# weave launch --no-dns 192.168.56.4 192.168.56.5
78f459a4a8acc07d46c1f86a15a519b91978c809876452b9d9c1294e760394a9

root@u2:~# weave launch --no-dns 192.168.56.3 192.168.56.5
1f379e50f3917e05bd133589f75594d7b2da20a680bb1e5e7172e37a18abe3ff

root@u3:~# weave launch --no-dns 192.168.56.3 192.168.56.4
aa600bfad8db8711e2cbc5f8e127022460ca3738226dd7aa33bb5b9b049f8cee
执行完上面命令后,在任意一个vm节点上执行下面命令,查看节点weave之间的连接状态:
root@u1:~# weave status connections
<- 192.168.56.4:54715    established fastdp 8e:d8:ad:a8:32:eb(u2) mtu=1376
<- 192.168.56.5:51504    established fastdp f6:58:43:5c:68:d7(u3) mtu=1376
我们看到u1节点已经和u2、u3节点成功建立了连接,weave的工作模式是fastdp(fast data path),mtu为默认的1376(适当调节weave mtu可以提升weave overlay network的网络性能)。
我们也可以通过weave status命令查看一下weave网络的整体状态:
# weave status

        Version: 2.5.1 (up to date; next check at 2019/04/18 12:35:41)

        Service: router
       Protocol: weave 1..2
           Name: f6:58:43:5c:68:d7(u3)
     Encryption: disabled
  PeerDiscovery: enabled
        Targets: 3
    Connections: 3 (2 established, 1 failed)
          Peers: 3 (with 6 established connections)
 TrustedSubnets: none

        Service: ipam
         Status: ready
          Range: 10.32.0.0/12
  DefaultSubnet: 10.32.0.0/12

        Service: dns
         Domain: weave.local.
       Upstream: 10.0.3.3
            TTL: 1
        Entries: 0

        Service: proxy
        Address: unix:///var/run/weave/weave.sock

        Service: plugin (legacy)
     DriverName: weave
3. 在weave overlay network中创建container并测试overlay网内container的互通性
我们通过为docker指定net driver为weave的方式让docker在weave overlay network中创建container:
root@u1:~# docker run -ti --net=weave busybox /bin/sh

root@u2:~# docker run -ti --net=weave busybox /bin/sh

root@u3:~# docker run -ti --net=weave busybox /bin/sh
我们在u1上启动的容器内去ping位于其他两个vm上启动的新容器:
/ # ping -c 3 10.32.0.1
PING 10.32.0.1 (10.32.0.1): 56 data bytes
64 bytes from 10.32.0.1: seq=0 ttl=64 time=1.540 ms
64 bytes from 10.32.0.1: seq=1 ttl=64 time=1.548 ms
64 bytes from 10.32.0.1: seq=2 ttl=64 time=1.434 ms

--- 10.32.0.1 ping statistics ---
3 packets transmitted, 3 packets received, 0% packet loss
round-trip min/avg/max = 1.434/1.507/1.548 ms

/ # ping -c 3 10.46.0.0
PING 10.46.0.0 (10.46.0.0): 56 data bytes
64 bytes from 10.46.0.0: seq=0 ttl=64 time=5.118 ms
64 bytes from 10.46.0.0: seq=1 ttl=64 time=1.608 ms
64 bytes from 10.46.0.0: seq=2 ttl=64 time=1.837 ms

--- 10.46.0.0 ping statistics ---
3 packets transmitted, 3 packets received, 0% packet loss
round-trip min/avg/max = 1.608/2.854/5.118 ms
我们看到位于weave overlay network中的三个容器是连通的。
4. 测试host到weave overlay网络中容器的连通性
考虑到后续host上的consul会对部署在weave overlay network中的container中的服务做health check,因此需要在host上能连通位于overlay network中的container。
我们来测试一下:
root@u1:~# docker run -ti --net=weave busybox /bin/sh

/ # ip a
1: lo: <LOOPBACK,UP,LOWER_UP> mtu 65536 qdisc noqueue qlen 1
    link/loopback 00:00:00:00:00:00 brd 00:00:00:00:00:00
    inet 127.0.0.1/8 scope host lo
       valid_lft forever preferred_lft forever
29: ethwe0@if30: <BROADCAST,MULTICAST,UP,LOWER_UP,M-DOWN> mtu 1376 qdisc noqueue
    link/ether aa:8f:45:8f:5f:d6 brd ff:ff:ff:ff:ff:ff
    inet 10.40.0.0/12 brd 10.47.255.255 scope global ethwe0
       valid_lft forever preferred_lft forever
31: eth0@if32: <BROADCAST,MULTICAST,UP,LOWER_UP,M-DOWN> mtu 1500 qdisc noqueue
    link/ether 02:42:ac:12:00:02 brd ff:ff:ff:ff:ff:ff
    inet 172.18.0.2/16 brd 172.18.255.255 scope global eth0
       valid_lft forever preferred_lft forever

root@u1:~# ping 10.40.0.0
PING 10.40.0.0 (10.40.0.0) 56(84) bytes of data.

^C
--- 10.40.0.0 ping statistics ---
4 packets transmitted, 0 received, 100% packet loss, time 3024ms
从测试结果来看,在host无法ping通位于weave network上的container。这个问题实则也显而易见,因为当前host上的路由表中没有以weave网络range: 10.32.0.0/12为目的地址的路由,并且weave网络设备也并未启用ip地址:
root@u1:~# ip route
default via 10.0.3.2 dev enp0s8
10.0.3.0/24 dev enp0s8  proto kernel  scope link  src 10.0.3.15
172.17.0.0/16 dev docker0  proto kernel  scope link  src 172.17.0.1
172.18.0.0/16 dev docker_gwbridge  proto kernel  scope link  src 172.18.0.1
192.168.56.0/24 dev enp0s3  proto kernel  scope link  src 192.168.56.3
关于这个问题,weave官方给出了答案:我们可以通过weave expose命令自动为主机上的weave设备分配ip地址,添加到10.32.0.0/12的路由。
root@u1:~# weave expose
10.40.0.1

root@u1:~# ip a

.... ...

7: weave: <BROADCAST,MULTICAST,UP,LOWER_UP> mtu 1376 qdisc noqueue state UP group default qlen 1000
    link/ether b2:97:b5:7b:0f:a9 brd ff:ff:ff:ff:ff:ff
    inet 10.40.0.1/12 brd 10.47.255.255 scope global weave
       valid_lft forever preferred_lft forever
    inet6 fe80::b097:b5ff:fe7b:fa9/64 scope link
       valid_lft forever preferred_lft forever

.... ...

root@u1:~# ip route
default via 10.0.3.2 dev enp0s8
10.0.3.0/24 dev enp0s8  proto kernel  scope link  src 10.0.3.15
10.32.0.0/12 dev weave  proto kernel  scope link  src 10.40.0.1
172.17.0.0/16 dev docker0  proto kernel  scope link  src 172.17.0.1
172.18.0.0/16 dev docker_gwbridge  proto kernel  scope link  src 172.18.0.1
192.168.56.0/24 dev enp0s3  proto kernel  scope link  src 192.168.56.3
我们看到在u1节点上执行完expose之后,weave设备拥有了自己的ip地址,并且主机路由表中也增加了10.32.0.0/12网络的路由。我们再来测试一下u1上主机到container是否通了:
root@u1:~# ping 10.40.0.0
PING 10.40.0.0 (10.40.0.0) 56(84) bytes of data.
64 bytes from 10.40.0.0: icmp_seq=1 ttl=64 time=4.42 ms

64 bytes from 10.40.0.0: icmp_seq=2 ttl=64 time=1.04 ms
64 bytes from 10.40.0.0: icmp_seq=3 ttl=64 time=1.21 ms
^C
--- 10.40.0.0 ping statistics ---
3 packets transmitted, 3 received, 0% packet loss, time 2003ms
rtt min/avg/max/mdev = 1.048/2.228/4.425/1.554 ms
网络已经打通。我们继续在u2、u3两个节点上执行weave expose,这样三台主机都可以通过网络reach到位于任何一台主机上的、weave network中的container。
而从container到host,原本就可以访问,以u1上的container为例:
/ # ping 192.168.56.3
PING 192.168.56.3 (192.168.56.3): 56 data bytes
64 bytes from 192.168.56.3: seq=0 ttl=64 time=0.345 ms
^C
--- 192.168.56.3 ping statistics ---
1 packets transmitted, 1 packets received, 0% packet loss
round-trip min/avg/max = 0.345/0.345/0.345 ms

/ # ping 192.168.56.4
PING 192.168.56.4 (192.168.56.4): 56 data bytes
64 bytes from 192.168.56.4: seq=0 ttl=63 time=1.277 ms
^C
--- 192.168.56.4 ping statistics ---
1 packets transmitted, 1 packets received, 0% packet loss
round-trip min/avg/max = 1.277/1.277/1.277 ms
三、安装consul和nomad集群
在《使用nomad实现集群管理和微服务部署调度》一文中,我们已经详细说过consul和nomad的安装配置过程,这里仅列出步骤,不再详细说明。已经有环境的朋友可以略过该步骤!
1. 安装consul
在每个节点上执行下面步骤安装:
# wget -c https://releases.hashicorp.com/consul/1.4.4/consul_1.4.4_linux_amd64.zip
# unzip consul_1.4.4_linux_amd64.zip
# mv consul /usr/local/bin

# mkdir -p ~/consul-install/consul-data
启动consul集群:
u1:

# nohup consul agent -server -ui -dns-port=53 -bootstrap-expect=3 -data-dir=/root/consul-install/consul-data -node=consul-1 -client=0.0.0.0 -bind=192.168.56.3 -datacenter=dc1 > consul-1.log & 2>&1

u2:

# nohup consul agent -server -ui -dns-port=53 -bootstrap-expect=3 -data-dir=/root/consul-install/consul-data -node=consul-2 -client=0.0.0.0 -bind=192.168.56.4 -datacenter=dc1 -join 192.168.56.3 > consul-2.log & 2>&1

u3:

nohup consul agent -server -ui -dns-port=53  -bootstrap-expect=3 -data-dir=/root/consul-install/consul-data -node=consul-3 -client=0.0.0.0 -bind=192.168.56.5 -datacenter=dc1 -join 192.168.56.3 > consul-3.log & 2>&1
查看启动状态:
#  consul operator raft list-peers
Node      ID                                    Address            State     Voter  RaftProtocol
consul-1  db838e7c-2b02-949b-763b-a6646ee51981  192.168.56.3:8300  leader    true   3
consul-2  33c81139-5054-7e76-f320-7d28d7528cc8  192.168.56.4:8300  follower  true   3
consul-3  4eda7d24-3fe2-45f5-f4ad-b95fa39f13c1  192.168.56.5:8300  follower  true   3
如果输出类似上面的日志,则说明consul集群启动成功!
接下来为了利用consul内嵌的DNS server,我们修改一下各个node的DNS配置 /etc/resolvconf/resolv.conf.d/base:
//  /etc/resolvconf/resolv.conf.d/base

nameserver 192.168.56.3
nameserver 192.168.56.4

options timeout:2 attempts:3 rotate single-request-reopen

# /etc/init.d/resolvconf restart

[ ok ] Restarting resolvconf (via systemctl): resolvconf.service.
2. 安装nomad并启动nomad集群
下面是在每个node上安装nomad的步骤:
# wget -c https://releases.hashicorp.com/nomad/0.8.7/nomad_0.8.7_linux_amd64.zip

# mkdir nomad-install

# unzip nomad_0.8.7_linux_amd64.zip

# mv nomad /usr/local/bin

# nomad version
Nomad v0.8.7 (21a2d93eecf018ad2209a5eab6aae6c359267933+CHANGES)
在每个node上创建agent.hcl文件,放到nomad-install下面:
// agent.hcl

data_dir = "/root/nomad-install/nomad.d"

bind_addr = "192.168.56.3" //node 内网ip,这里以u1 host为例

server {
  enabled = true
  bootstrap_expect = 3
}

client {
  enabled = true
}
启动集群(基于consul):
u1:

# nohup nomad agent -config=/root/nomad-install/agent.hcl  > nomad-1.log & 2>&1

u2:

# nohup nomad agent -config=/root/nomad-install/agent.hcl  > nomad-2.log & 2>&1

u3:

# nohup nomad agent -config=/root/nomad-install/agent.hcl  > nomad-3.log & 2>&1
查看nomad集群状态:
# nomad server members -address="http://192.168.56.3:4646"
Name       Address       Port  Status  Leader  Protocol  Build  Datacenter  Region
u1.global  192.168.56.3  4648  alive   false   2         0.8.7  dc1         global
u2.global  192.168.56.4  4648  alive   true    2         0.8.7  dc1         global
u3.global  192.168.56.5  4648  alive   false   2         0.8.7  dc1         global

# nomad operator raft list-peers -address="http://192.168.56.3:4646"
Node       ID                 Address            State     Voter  RaftProtocol
u3.global  192.168.56.5:4647  192.168.56.5:4647  follower  true   2
u2.global  192.168.56.4:4647  192.168.56.4:4647  leader    true   2
u1.global  192.168.56.3:4647  192.168.56.3:4647  follower  true   2
nomad集群启动成功!
四. nomad实现在weave overlay network中的job部署
1. 创建位于weave overlay network中的nomad task service实例
我们定义如下nomad job的配置文件:
//httpbackend.nomad

job "httpbackend" {
  datacenters = ["dc1"]
  type = "service"

  group "httpbackend" {
    count = 3

    task "httpbackend" {
      driver = "docker"
      config {
        image = "bigwhite/httpbackendservice:v1.0.0"
        dns_servers =  ["192.168.56.3", "192.168.56.4", "192.168.56.5"]
        network_mode = "weave"
        logging {
          type = "json-file"
        }
      }

      resources {
        network {
          mbits = 10
        }
      }

      service {
        name = "httpbackend"
      }
    }
  }
}
与之前文章中job的配置文件不同的是,该job配置在task的config中增加了:
-
dns_servers:由于docker 18.09在-net=weave下,container没有继承host的/etc/resolv.conf文件,我们为了能在container中通过服务的domain查询到其真实ip地址,我们在docker的执行参数中加入dns_servers,我们将u1,u2,u3都作为dns server提供了。
-
network_node:我们希望nomad调度负载、创建docker容器时将docker container创建在weave network中,因此我们在network_node中传入”weave”,这就相当于在执行docker时执行:docker run … –net=weave … …
我们来创建一下该job:
# nomad job run -address=http://192.168.56.3:4646 httpbackend.nomad

==> Monitoring evaluation "806eaecf"
    Evaluation triggered by job "httpbackend"
    Allocation "6e06be74" created: node "11212ed9", group "httpbackend"
    Allocation "e7ed8569" created: node "aa5a06fe", group "httpbackend"
    Allocation "fd6c6a05" created: node "fe7a7e9c", group "httpbackend"
    Evaluation status changed: "pending" -> "complete"
==> Evaluation "806eaecf" finished with status "complete"

# nomad job status -address=http://192.168.56.3:4646  httpbackend
ID            = httpbackend
Name          = httpbackend
Submit Date   = 2019-04-19T13:18:21+08:00
Type          = service
Priority      = 50
Datacenters   = dc1
Status        = running
Periodic      = false
Parameterized = false

Summary
Task Group   Queued  Starting  Running  Failed  Complete  Lost
httpbackend  0       0         3        0       0         0

Allocations
ID        Node ID   Task Group   Version  Desired  Status   Created  Modified
6e06be74  11212ed9  httpbackend  0        run      running  54s ago  7s ago
e7ed8569  aa5a06fe  httpbackend  0        run      running  54s ago  6s ago
fd6c6a05  fe7a7e9c  httpbackend  0        run      running  54s ago  12s ago
我们查看一下u1节点上的httpbackend负载的状态和ip:
root@u1:~/nomad-install/jobs# docker ps
CONTAINER ID        IMAGE                    COMMAND                  CREATED             STATUS              PORTS               NAMES
2e2229cf8f64        c196c122feea             "/root/httpbackendse…"   49 seconds ago      Up 48 seconds                           httpbackend-e7ed8569-fdde-537b-91b3-84583d1ea238
912ac43350f7        weaveworks/weave:2.5.1   "/home/weave/weaver …"   22 hours ago        Up 22 hours                             weave

root@u1:~/nomad-install/jobs# docker exec 2e2229cf8f64 ip a
... ...
49: ethwe0@if50: <BROADCAST,MULTICAST,UP,LOWER_UP,M-DOWN> mtu 1376 qdisc noqueue
    link/ether a2:f1:ef:d7:89:ee brd ff:ff:ff:ff:ff:ff
    inet 10.40.0.0/12 brd 10.47.255.255 scope global ethwe0
       valid_lft forever preferred_lft forever
.... ...
我们看到新创建的container的ip为10.40.0.0,是weave network subnet range中的一个地址。
我们访问一下该服务:
# curl http://10.40.0.0:8081
this is httpbackendservice, version: v1.0.0
我们看到了预期返回的结果。通过consul的域名访问也同样ok:
# curl httpbackend.service.dc1.consul:8081
this is httpbackendservice, version: v1.0.0
我们从一个位于weave network中的container中去访问httpbackend服务,依然会得到正确的应答结果:
# docker run -ti --net=weave --dns=192.168.56.3 --dns=8.8.8.8 ubuntu /bin/bash

root@3fe76a39b66f:/# curl httpbackend.service.dc1.consul:8081
this is httpbackendservice, version: v1.0.0
五、 应用隔离
有些时候我们需要将部署的应用之间做隔离,让彼此无法互相访问。weave overlay network是支持这样做的,我们一起来看一下。
1.重建weave网络
我们首先需要重新创建weave网络,使之能支持划分不同subnet。
先在每个node上执行下面命令,将原有的weave网络清理干净:
# weave reset
执行后,发现weave网络设备、weave相关容器、路由表中有关weave的路由都不见了。
我们重新建立三节点的weave网络,在这个10.32.0.0/16的大网中,我们划分若干subnet,默认的subnet为10.32.0.0/24。
u1:

# weave launch --no-dns --ipalloc-range 10.32.0.0/16 --ipalloc-default-subnet 10.32.0.0/24 192.168.56.4 192.168.56.5

# weave expose

u2:

# weave launch --no-dns --ipalloc-range 10.32.0.0/16 --ipalloc-default-subnet 10.32.0.0/24 192.168.56.3 192.168.56.5

# weave expose

u3:

# weave launch --no-dns --ipalloc-range 10.32.0.0/16 --ipalloc-default-subnet 10.32.0.0/24 192.168.56.3 192.168.56.4

# weave expose
接下来我们在不同的subnet下分别建立两个container:
首先在u1上,在default subnet下建立两个container a1和a2:
#docker run -ti --net=weave --dns=192.168.56.3 --dns=8.8.8.8 --name a1 busybox /bin/sh

#docker run -ti --net=weave --dns=192.168.56.3 --dns=8.8.8.8 --name a2 busybox /bin/sh
再在u2上在subnet 10.32.1.0/24下建立两个container:b1和b2
u2上:

# docker run -ti --net=weave --dns=192.168.56.3 --dns=8.8.8.8 -e WEAVE_CIDR=net:10.32.1.0/24 --name b1 busybox /bin/sh

# docker run -ti --net=weave --dns=192.168.56.3 --dns=8.8.8.8 -e WEAVE_CIDR=net:10.32.1.0/24 --name b2 busybox /bin/sh
我们经过测试发现:a1与a2、a1与b1都是可以ping通的,这与我们的预期a1与b1、b2不通不符。我们发现b1(10.32.0.2)、b2(10.32.0.3)两个容器的ip地址居然依然在default subnet内,似乎通过环境变量WEAVE_CIDR传递的subnet信息没有生效。
在weave的一个issue中,有开发者提到:WEAVE_CIDR仅用于weave proxy模式,在weave作为plugin模式工作时,docker不会将该环境变量信息传递给weave。也就是说即便上面在u2上创建b1、b2时设置了环境变量WEAVE_CIDR,weave插件也无法得到该信息,于是依旧在默认subnet范围为b1、b2分配了ip。
2. 让docker使用weave proxy模式
weave proxy是位于docker client与docker engine(docker daemon)之间的代理服务:
docker client --> weave proxy ---> docker engine/daemon
默认情况下,/var/run/docker.sock是docker client和docker engine之间的通信“媒介”,Docker daemon默认监听的Unix域套接字(Unix domain socket):/var/run/docker.sock,docker client以及容器中的进程可以通过它与Docker daemon进行通信。
我们可通过docker -H xxx.sock或通过设置 DOCKER_HOST环境变量的方式让docker client与传入的unix socket通信。这样我们就可以将weave proxy的套接字unix:///var/run/weave/weave.sock(通过weave env查看到)传给docker client了。我们来测试一下:
u1:

# docker -H unix:///var/run/weave/weave.sock run -ti --dns=192.168.56.3 --dns=8.8.8.8 --name a1 busybox /bin/sh

# docker -H unix:///var/run/weave/weave.sock run -ti --dns=192.168.56.3 --dns=8.8.8.8 --name a2 busybox /bin/sh

u2:

# docker -H unix:///var/run/weave/weave.sock  run -ti --dns=192.168.56.3 --dns=8.8.8.8 -e WEAVE_CIDR=net:10.32.1.0/24 --name b1 busybox /bin/sh

#docker -H unix:///var/run/weave/weave.sock run -ti --dns=192.168.56.3 --dns=8.8.8.8 -e WEAVE_CIDR=net:10.32.1.0/24 --name b2 busybox /bin/sh
四个container启动后,我们发现b1、b2的ip地址都在WEAVE_CIDR指定的空间内,a1、a2间互通;b1、b2间互通,但a1、a2与b1、b2间是不通的。这样就与预期相符了。
3. nomad与weave proxy模式集成实现应用工作负载的隔离
接下来,我们来看看如何将nomad和weave的proxy模式集成在一起,实现工作负载分配在不同subnet。
这里我们就无法仅仅通过在job配置文件中传入参数的方式来实现了,我们需要修改一下agent.hcl并重启nomad集群。以u1节点上的agent.hcl为例,我们需要改为下面这样:
data_dir = "/root/nomad-install/nomad.d"

bind_addr = "192.168.56.5"

server {
  enabled = true
  bootstrap_expect = 3
}

client {
  enabled = true
  "options":{
     "docker.endpoint":"unix://var/run/weave/weave.sock"
  }
}
我们在client配置block中增加一个options,设置了docker.endpoint为weave proxy监听的weave.sock。重启集群:
u1:

# nohup nomad agent -config=/root/nomad-install/agent.hcl  > nomad-1.log & 2>&1

u2:

# nohup nomad agent -config=/root/nomad-install/agent.hcl  > nomad-2.log & 2>&1

u3:

# nohup nomad agent -config=/root/nomad-install/agent.hcl  > nomad-3.log & 2>&1
接下来,我们重建一个httpbackend-another-subnet.nomad,内容如下:
//httpbackend-another-subnet.nomad

job "httpbackend" {
  datacenters = ["dc1"]
  type = "service"

  group "httpbackend" {
    count = 3

    task "httpbackend" {
      driver = "docker"
      config {
        image = "bigwhite/httpbackendservice:v1.0.0"
        dns_servers =  ["192.168.56.3", "192.168.56.4", "192.168.56.5"]
        logging {
          type = "json-file"
        }
      }

      env {
        WEAVE_CIDR="net:10.32.1.0/24"
      }

      resources {
        network {
          mbits = 10
        }
      }

      service {
        name = "httpbackend"
      }
    }
  }
}
我们去掉了network_mode = “weave”,增加了一个env:WEAVE_CIDR=”net:10.32.1.0/24″。run这个job:
# nomad job run -address=http://192.168.56.3:4646 httpbackend-another-subnet.nomad
==> Monitoring evaluation "e94bdd00"
    Evaluation triggered by job "httpbackend"
    Allocation "3f5032b5" created: node "11212ed9", group "httpbackend"
    Allocation "40d75ae8" created: node "aa5a06fe", group "httpbackend"
    Allocation "627fe1e7" created: node "fe7a7e9c", group "httpbackend"
    Evaluation status changed: "pending" -> "complete"
==> Evaluation "e94bdd00" finished with status "complete"

# docker ps
CONTAINER ID        IMAGE                    COMMAND                  CREATED             STATUS              PORTS               NAMES
700bbea7c89e        c196c122feea             "/w/w /root/httpback…"   17 seconds ago      Up 16 seconds                           httpbackend-40d75ae8-fe75-c560-b87b-c1272db4850c
8b7e29522b8b        weaveworks/weave:2.5.1   "/home/weave/weaver …"   10 hours ago        Up 10 hours                             weave
root@u1:~/nomad-install/jobs# docker exec 700bbea7c89e ip a
1: lo: <LOOPBACK,UP,LOWER_UP> mtu 65536 qdisc noqueue qlen 1
    link/loopback 00:00:00:00:00:00 brd 00:00:00:00:00:00
    inet 127.0.0.1/8 scope host lo
       valid_lft forever preferred_lft forever
142: eth0@if143: <BROADCAST,MULTICAST,UP,LOWER_UP,M-DOWN> mtu 1500 qdisc noqueue
    link/ether 02:42:ac:11:00:02 brd ff:ff:ff:ff:ff:ff
    inet 172.17.0.2/16 brd 172.17.255.255 scope global eth0
       valid_lft forever preferred_lft forever
144: ethwe@if145: <BROADCAST,MULTICAST,UP,LOWER_UP,M-DOWN> mtu 1376 qdisc noqueue
    link/ether f2:55:9d:26:72:56 brd ff:ff:ff:ff:ff:ff
    inet 10.32.1.192/24 brd 10.32.1.255 scope global ethwe
       valid_lft forever preferred_lft forever
我们看到新创建的httpbackend container的ip已经分配到10.32.1.0/24 subnet下面了。这种方式使得我们可以任意安排我们的job放入哪个subnet。
4. 遗留问题
我们通过consul go api试图从consul中获取service: httpbackend的ip信息,我们得到了如下的输出:
#  ./services
10.0.3.15 : 0
10.0.3.15 : 0
10.0.3.15 : 0
[]
如果在httpbackend的service配置中使用如下配置:
 service {
        name = "httpbackend"
        address_mode = "driver"
      }
那么,我们得到的是下面结果:
# ./services
172.17.0.3 : 0
172.17.0.2 : 0
172.17.0.2 : 0
[]
也就是说nomad在consul中记录的container的advertise ip不是我们想要的weave subnet网段的ip信息,这样就会导致我们通过consul的DNS服务或者通过consul api获取的服务ip信息有误,导致无法通过这两种方式访问到服务实例。在nomad的最新版v0.9.0中该问题依然存在。
综上,“隔离”的目的得到了部分满足,期待后续nomad的改进。
六、参考资料
-
https://www.weave.works/docs/net/latest/install/installing-weave/
-
https://www.weave.works/docs/net/latest/install/using-weave/#peer-connections
-
https://www.weave.works/docs/net/latest/install/plugin/plugin/#launching
-
https://www.weave.works/docs/net/latest/tasks/manage/host-network-integration/
-
https://docs.docker.com/v17.09/engine/userguide/networking/configure-dns/
-
https://www.nomadproject.io/docs/drivers/docker.html#client-requirements
-
https://www.weave.works/docs/net/latest/tasks/manage/application-isolation/
-
https://www.weave.works/docs/net/latest/tasks/weave-docker-api/weave-docker-api/
-
https://www.nomadproject.io/docs/job-specification/service.html#using-driver-address-mode
本文涉及到的配置文件和源码,参见这里。
我的网课“Kubernetes实战:高可用集群搭建、配置、运维与应用”在慕课网上线了,感谢小伙伴们学习支持!
我爱发短信:企业级短信平台定制开发专家 https://tonybai.com/
smspush : 可部署在企业内部的定制化短信平台,三网覆盖,不惧大并发接入,可定制扩展; 短信内容你来定,不再受约束, 接口丰富,支持长短信,签名可选。
著名云主机服务厂商DigitalOcean发布最新的主机计划,入门级Droplet配置升级为:1 core CPU、1G内存、25G高速SSD,价格5$/月。有使用DigitalOcean需求的朋友,可以打开这个链接地址:https://m.do.co/c/bff6eed92687 开启你的DO主机之路。
我的联系方式:
微博:https://weibo.com/bigwhite20xx
微信公众号:iamtonybai
博客:tonybai.com
github: https://github.com/bigwhite
微信赞赏:

商务合作方式:撰稿、出书、培训、在线课程、合伙创业、咨询、广告合作。