第1期的“写Go代码时遇到的那些问题”一经发布后得到了很多Gopher的支持和赞赏,这也是我继续写下去的动力!不过这里依然要强调的是这一系列文章反映的是笔者在实践中对代码编写的认知以及代码的演化过程。这里的代码也许只是“中间阶段”,并不是什么最优的结果,我记录的只是对问题、对代码的一个思考历程。不过,十分欢迎交流与批评指正。
一、dep的日常操作
虽然dep在国内使用依然有init失败率较高(因为一些qiang外的第三方package)的坎儿,但我和主流Gopher社区和项目一样,义无反顾地选择在代码库中使用dep。本周dep刚刚发布了0.4.1版本,与之前版本最大的不同在于dep发布了其官网以及相对完整的文档(以替代原先在github项目主页上的简陋的、格式较low的FAQ),这也是dep继续走向成熟的一个标志。不过关于dep何时能merge到go tools链当中,目前还是未知数。不过dep会在相当长的一段时期继续以独立工具的形式存在,直到merge到Go tools中并被广泛接受。
包依赖管理工具在日常开发中并不需要太多的存在感,我们需要的这类工具特征是功能强大但接口“小”,对开发者体验好,不太需要太关心其运行原理,dep基本符合。dep日常操作最主要的三个命令:dep init、dep ensure和dep status。在《初窥dep》一文中,我曾重点说过dep init原理,这里就不重点说了,我们用一个例子来说说使用dep的日常workflow。
1、dep init empty project
我们可以对一个empty project或一个初具框架雏形的project进行init,这里init一个empty project,作为后续的示例基础:
➜  $GOPATH/src/depdemo $dep init -v
Getting direct dependencies...
Checked 1 directories for packages.
Found 0 direct dependencies.
Root project is "depdemo"
 0 transitively valid internal packages
 0 external packages imported from 0 projects
(0)   ✓ select (root)
  ✓ found solution with 0 packages from 0 projects

Solver wall times by segment:
  select-root: 68.406µs
        other:  9.806µs

  TOTAL: 78.212µs

➜  $GOPATH/src/depdemo $ls
Gopkg.lock    Gopkg.toml    vendor/

➜  $GOPATH/src/depdemo $dep status
PROJECT  CONSTRAINT  VERSION  REVISION  LATEST  PKGS USED
dep init有三个输出:Gopkg.lock、Gopkg.toml和vendor目录,其中Gopkg.toml(包含example,但注释掉了)和vendor都是空的,Gopkg.lock中仅包含了一些给gps使用的metadata:
➜  $GOPATH/src/depdemo git:(a337d5b) $cat Gopkg.lock
# This file is autogenerated, do not edit; changes may be undone by the next 'dep ensure'.

[solve-meta]
  analyzer-name = "dep"
  analyzer-version = 1
  inputs-digest = "ab4fef131ee828e96ba67d31a7d690bd5f2f42040c6766b1b12fe856f87e0ff7"
  solver-name = "gps-cdcl"
  solver-version = 1
2、常规操作循环:for { 填代码 -> dep ensure }
接下来的常规操作就是我们要为project添加代码了。我们先来为工程添加一个main.go文件,源码如下:
// main.go
package main

import "fmt"

func main() {
    fmt.Println("depdemo")
}
这份代码的依赖只是std库的fmt,并没有使用第三方的依赖,因此当我们通过dep status查看当前状态、使用ensure去做同步时,发现dep并没有什么要做的:
➜  $GOPATH/src/depdemo $dep status
PROJECT  CONSTRAINT  VERSION  REVISION  LATEST  PKGS USED
➜  $GOPATH/src/depdemo $dep ensure -v
Gopkg.lock was already in sync with imports and Gopkg.toml
好吧。我们再来为main.go添点“有用”的内容:一段读取toml配置文件的代码。
//data.toml
id = "12345678abcdefgh"
name = "tonybai"
city = "shenyang"

// main.go
package main

import (
    "fmt"
    "log"

    "github.com/BurntSushi/toml"
)

type Person struct {
    ID   string
    Name string
    City string
}

func main() {
    p := Person{}
    if _, err := toml.DecodeFile("./data.toml", &p); err != nil {
        log.Fatal(err)
    }

    fmt.Println(p)
}
之后,再来执行dep status:
➜  $GOPATH/src/depdemo $dep status
Lock inputs-digest mismatch due to the following packages missing from the lock:

PROJECT                     MISSING PACKAGES
github.com/BurntSushi/toml  [github.com/BurntSushi/toml]

This happens when a new import is added. Run `dep ensure` to install the missing packages.
input-digest mismatch
我们看到dep status检测到项目出现”不同步”的情况(代码中引用的toml包在Gopkg.lock中没有),并建议使用dep ensure命令去做一次sync。
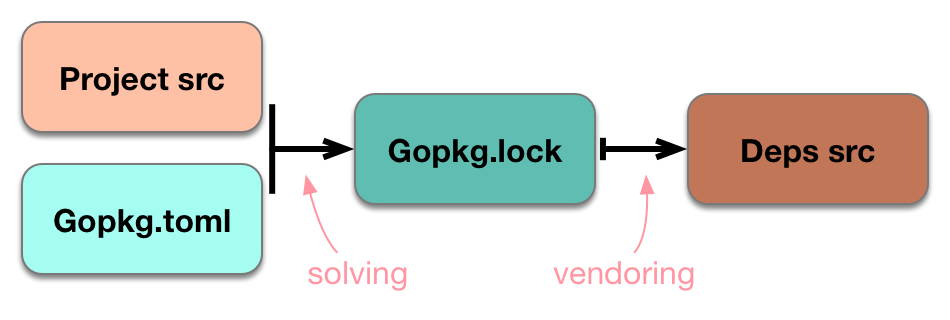
我们来ensure一下(ensure的输入输出见上图):
$GOPATH/src/depdemo git:(master) $dep ensure -v
Root project is "depdemo"
 1 transitively valid internal packages
 1 external packages imported from 1 projects
(0)   ✓ select (root)

(1)    ? attempt github.com/BurntSushi/toml with 1 pkgs; 7 versions to try
(1)        try github.com/BurntSushi/toml@v0.3.0
(1)    ✓ select github.com/BurntSushi/toml@v0.3.0 w/1 pkgs
  ✓ found solution with 1 packages from 1 projects

Solver wall times by segment:
     b-source-exists: 15.821158205s
... ...
  b-deduce-proj-root:       5.453µs

  TOTAL: 16.176846089s

(1/1) Wrote github.com/BurntSushi/toml@v0.3.0
我们来看看项目中的文件都发生了哪些变化:
$git status
On branch master
Changes not staged for commit:
  (use "git add <file>..." to update what will be committed)
  (use "git checkout -- <file>..." to discard changes in working directory)

    modified:   Gopkg.lock

Untracked files:
  (use "git add <file>..." to include in what will be committed)

    vendor/
可以看到Gopkg.lock文件和vendor目录下发生了变化:
$git diff

diff --git a/Gopkg.lock b/Gopkg.lock
index bef2d00..c5ae854 100644
--- a/Gopkg.lock
+++ b/Gopkg.lock
@@ -1,9 +1,15 @@
 # This file is autogenerated, do not edit; changes may be undone by the next 'dep ensure'.

+[[projects]]
+  name = "github.com/BurntSushi/toml"
+  packages = ["."]
+  revision = "b26d9c308763d68093482582cea63d69be07a0f0"
+  version = "v0.3.0"
+
 [solve-meta]
   analyzer-name = "dep"
   analyzer-version = 1
-  inputs-digest = "ab4fef131ee828e96ba67d31a7d690bd5f2f42040c6766b1b12fe856f87e0ff7"
+  inputs-digest = "25c744eb70aefb94032db749509fd34b2fb6e7c6041e8b8c405f7e97d10bdb8d"
   solver-name = "gps-cdcl"
   solver-version = 1

$tree -L 2 vendor
vendor
└── github.com
    └── BurntSushi
可以看到Gopkg.lock中增加了toml包的依赖条目(版本v0.3.0),input-digest这个元数据字段的值也发生了变更;并且vendor目录下多了toml包的源码,至此项目又到达了“同步”状态。
3、添加约束
大多数情况下,我们到这里就算完成了dep work flow的一次cycle,但如果你需要为第三方包的版本加上一些约束条件,那么dep ensure -add就会派上用场,比如说:我们要使用toml包的v0.2.x版本,而不是v0.3.0版本,我们需要为github.com/BurntSushi/toml添加一条约束:
$dep ensure -v -add github.com/BurntSushi/toml@v0.2.0
Fetching sources...
(1/1) github.com/BurntSushi/toml@v0.2.0

Root project is "depdemo"
 1 transitively valid internal packages
 1 external packages imported from 1 projects
(0)   ✓ select (root)
(1)    ? attempt github.com/BurntSushi/toml with 1 pkgs; at least 1 versions to try
(1)        try github.com/BurntSushi/toml@v0.3.0
(2)    ✗   github.com/BurntSushi/toml@v0.3.0 not allowed by constraint ^0.2.0:
(2)        ^0.2.0 from (root)
(1)        try github.com/BurntSushi/toml@v0.2.0
(1)    ✓ select github.com/BurntSushi/toml@v0.2.0 w/1 pkgs
  ✓ found solution with 1 packages from 1 projects

Solver wall times by segment:
... ...

  TOTAL: 599.252392ms

(1/1) Wrote github.com/BurntSushi/toml@v0.2.0
add约束后,Gopkg.toml中增加了一条记录:
// Gopkg.toml
[[constraint]]
  name = "github.com/BurntSushi/toml"
  version = "0.2.0"
Gopkg.lock中的toml条目的版本回退为v0.2.0:
diff --git a/Gopkg.lock b/Gopkg.lock
index c5ae854..a557251 100644
--- a/Gopkg.lock
+++ b/Gopkg.lock
@@ -4,12 +4,12 @@
 [[projects]]
   name = "github.com/BurntSushi/toml"
   packages = ["."]
-  revision = "b26d9c308763d68093482582cea63d69be07a0f0"
-  version = "v0.3.0"
+  revision = "bbd5bb678321a0d6e58f1099321dfa73391c1b6f"
+  version = "v0.2.0"

 [solve-meta]
   analyzer-name = "dep"
   analyzer-version = 1
-  inputs-digest = "25c744eb70aefb94032db749509fd34b2fb6e7c6041e8b8c405f7e97d10bdb8d"
+  inputs-digest = "9fd144de0cc448be93418c927b5ce2a70e03ec7f260fa7e0867f970ff121c7d7"
   solver-name = "gps-cdcl"
   solver-version = 1

$dep status
PROJECT                     CONSTRAINT  VERSION  REVISION  LATEST  PKGS USED
github.com/BurntSushi/toml  ^0.2.0      v0.2.0   bbd5bb6   v0.2.0  1
vendor目录下的toml包源码也回退到v0.2.0的源码。关于约束规则的构成语法,可以参考dep文档。
4、revendor/update vendor
使用vendor机制后,由于第三方依赖包修正bug或引入你需要的功能,revendor第三方依赖包版本或者叫update vendor会成为一个周期性的工作。比如:toml包做了一些bugfix,并发布了v0.2.1版本。在我的depdemo中,为了一并fix掉这些bug,我需要重新vendor toml包。之前我们加的constraint是满足升级到v0.2.1版本的,因此我们不需要重新设置constraints,我们只需要单独revendor toml即可,可以使用dep ensure -update 命令:
$dep ensure -v -update github.com/BurntSushi/toml
Root project is "depdemo"
 1 transitively valid internal packages
 1 external packages imported from 1 projects
(0)   ✓ select (root)
(1)    ? attempt github.com/BurntSushi/toml with 1 pkgs; 7 versions to try
(1)        try github.com/BurntSushi/toml@v0.3.0
(2)    ✗   github.com/BurntSushi/toml@v0.3.0 not allowed by constraint ^0.2.0:
(2)        ^0.2.0 from (root)
(1)        try github.com/BurntSushi/toml@v0.2.0
(1)    ✓ select github.com/BurntSushi/toml@v0.2.0 w/1 pkgs
  ✓ found solution with 1 packages from 1 projects

Solver wall times by segment:
  b-list-versions: 1m18.267880815s
  .... ...
  TOTAL: 1m57.118656393s
由于真实的toml并没有v0.2.1版本且没有v0.2.x版本,因此我们的dep ensure -update并没有真正获取到数据。vendor和Gopkg.lock都没有变化。
5、dep日常操作小结
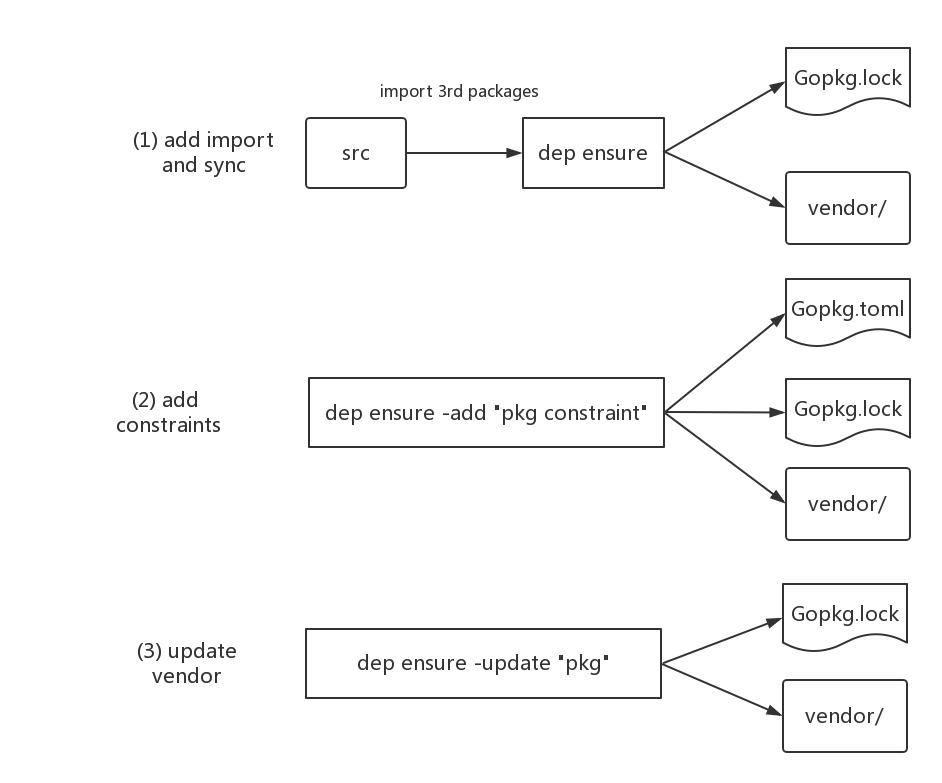
下面这幅图包含了上述三个dep日常操作,可以直观地看出不同操作后,对项目带来的改变:
“工欲善其事,必先利其器”,熟练的掌握dep的日常操作流程对提升开发效率大有裨益。
二、“超时等待退出”框架的一种实现
很多时候,我们在程序中都要启动多个goroutine协作完成应用的业务逻辑,比如:
func main() {
    go producer.Start()
    go consumer.Start()
    go watcher.Start()
    ... ...
}
启动容易停止难!当程序要退出时,最粗暴的方法就是不管三七二十一,main goroutine直接退出;优雅些的方式,也是*nix系统通常的作法是:通知一下各个Goroutine要退出了,然后等待一段时间后再真正退出。粗暴地直接退出的方式可能会导致业务数据的损坏、不完整或丢失。等待超时的方式虽然不能完全避免“损失”,但是它给了各个goroutine一个“挽救数据”的机会,可以尽可能地减少损失的程度。
但这些goroutine形态很可能不同,有些是server,有些可能是client worker或其manager,因此似乎很难用一种统一的框架全面管理他们的启动、运行和退出,于是我们缩窄“交互面”,我们只做“超时等待退出”。我们定义一个interface:
type GracefullyShutdowner interface {
    Shutdown(waitTimeout time.Duration) error
}
这样,凡是实现了该interface的类型均可在程序退出时得到退出的通知,并有机会做退出前的最后清理工作。这里还提供了一个类似http.HandlerFunc的类型ShutdownerFunc ,用于将普通function转化为实现了GracefullyShutdowner interface的类型实例:
type ShutdownerFunc func(time.Duration) error

func (f ShutdownerFunc) Shutdown(waitTimeout time.Duration) error {
    return f(waitTimeout)
}
1、并发退出
退出也至少有两种类型,一种是并发退出,这种退出方式下各个goroutine的退出先后次序对数据处理无影响;另外一种则是顺序退出,即各个goroutine之间的退出是必须按照一定次序进行的。我们先来说并发退出。上代码!
// shutdown.go
func ConcurrencyShutdown(waitTimeout time.Duration, shutdowners ...GracefullyShutdowner) error {
    c := make(chan struct{})

    go func() {
        var wg sync.WaitGroup
        for _, g := range shutdowners {
            wg.Add(1)
            go func(shutdowner GracefullyShutdowner) {
                shutdowner.Shutdown(waitTimeout)
                wg.Done()
            }(g)
        }
        wg.Wait()
        c <- struct{}{}
    }()

    select {
    case <-c:
        return nil
    case <-time.After(waitTimeout):
        return errors.New("wait timeout")
    }
}
我们将各个GracefullyShutdowner接口的实现以一个变长参数的形式传入ConcurrencyShutdown函数。ConcurrencyShutdown函数实现也很简单,通过:
- 为每个shutdowner启动一个goroutine实现并发退出,并将timeout参数传入shutdowner的Shutdown方法中;
- sync.WaitGroup在外层等待每个goroutine的退出;
- 通过select一个退出指示channel和time.After返回的timer channel来决定到底是正常退出还是超时退出。
该函数的具体使用方法可以参考:shutdown_test.go。
//shutdown_test.go
func shutdownMaker(processTm int) func(time.Duration) error {
    return func(time.Duration) error {
        time.Sleep(time.Second * time.Duration(processTm))
        return nil
    }
}

func TestConcurrencyShutdown(t *testing.T) {
    f1 := shutdownMaker(2)
    f2 := shutdownMaker(6)

    err := ConcurrencyShutdown(time.Duration(10)*time.Second, ShutdownerFunc(f1), ShutdownerFunc(f2))
    if err != nil {
        t.Errorf("want nil, actual: %s", err)
        return
    }

    err = ConcurrencyShutdown(time.Duration(4)*time.Second, ShutdownerFunc(f1), ShutdownerFunc(f2))
    if err == nil {
        t.Error("want timeout, actual nil")
        return
    }
}
2、串行退出
有了并发退出作为基础,串行退出也很简单了!
//shutdown.go
func SequentialShutdown(waitTimeout time.Duration, shutdowners ...GracefullyShutdowner) error {
    start := time.Now()
    var left time.Duration

    for _, g := range shutdowners {
        elapsed := time.Since(start)
        left = waitTimeout - elapsed

        c := make(chan struct{})
        go func(shutdowner GracefullyShutdowner) {
            shutdowner.Shutdown(left)
            c <- struct{}{}
        }(g)

        select {
        case <-c:
            //continue
        case <-time.After(left):
            return errors.New("wait timeout")
        }
    }

    return nil
}
串行退出的一个问题是waitTimeout的确定,因为这个超时时间是所有goroutine的退出时间之和。在上述代码里,我把每次的lefttime传入下一个要执行的goroutine的Shutdown方法中,外部select也同样使用这个left作为timeout的值。对照ConcurrencyShutdown,SequentialShutdown更简单,这里就不详细说了。
3、小结
这是一个可用的、抛砖引玉式的实现,但还有很多改进空间,比如:可以考虑一下获取每个shutdowner.Shutdown后的返回值(error),留给大家自行考量吧。
三、Testcase的setUp和tearDown
Go语言自带testing框架,事实证明这是Go语言的一个巨大优势之一,Gopher们也非常喜欢这个testing包。但Testing这个事情比较复杂,有些场景还需要我们自己动脑筋在标准testing框架下实现需要的功能,比如:当测试代码需要访问外部数据库、Redis或连接远端server时。遇到这种情况,很多人想到了Mock,没错。Mock技术在一定程度上可以解决这些问题,但如果使用mock技术,业务代码就得为了test而去做一层抽象,提升了代码理解的难度,在有些时候这还真不如直接访问真实的外部环境。
这里先不讨论这两种方式的好坏优劣,这里仅讨论如果在testing中访问真实环境我们该如何测试。在经典单元测试框架中,我们经常能看到setUp和tearDown两个方法,它们分别用于在testcase执行之前初始化testcase的执行环境以及在testcase执行后清理执行环境,以保证每两个testcase之间都是独立的、互不干扰的。在真实环境下进行测试,我们也可以利用setUp和tearDown来为每个testcase初始化和清理case依赖的真实环境。
setUp和tearDown也是有级别的,有全局级、testsuite级以及testcase级。在Go中,在标准testing框架下,我们接触到的是全局级和testcase级别。Go中对全局级的setUp和tearDown的支持还要追溯到Go 1.4,Go 1.4引入了TestMain方法,支持在诸多testcase执行之前为测试代码添加自定义setUp,以及在testing执行之后进行tearDown操作,例如:
func TestMain(m *testing.M) {
    err := setup()
    if err != nil {
        fmt.Println(err)
        os.Exit(-1)
    }

    r := m.Run()
    teardown()

    os.Exit(r)
}
但在testcase级别,Go testing包并没有提供方法上的支持。在2017年的GopherCon大会上,Hashicorp的创始人Mitchell Hashimoto做了题为:“Advanced Testing in Go”的主题演讲,这份资料里提出了一种较为优雅的为testcase进行setUp和teawDown的方法:
//setup-teardown-demo/foo_test.go
package foo_test

import (
    "fmt"
    "testing"
)

func setUp(t *testing.T, args ...interface{}) func() {
    fmt.Println("testcase setUp")
    // use t and args

    return func() {
        // use t
        // use args
        fmt.Println("testcase tearDown")
    }
}

func TestXXX(t *testing.T) {
    defer setUp(t)()
    fmt.Println("invoke testXXX")
}
这个方案充分利用了函数这个first-class type以及闭包的作用,每个Testcase可以定制自己的setUp和tearDown,也可以使用通用的setUp和tearDown,执行的效果如下:
$go test -v .
=== RUN   TestXXX
testcase setUp
invoke testXXX
testcase tearDown
--- PASS: TestXXX (0.00s)
PASS
ok      github.com/bigwhite/experiments/writing-go-code-issues/2nd-issue/setup-teardown-demo    0.010s
四、错误处理
本来想码一些关于Go错误处理的文字,但发现自己在2015年就写过一篇旧文《Go语言错误处理》,对Go错误处理的方方面面总结的很全面了。即便到今天也不过时,这当然也得益于Go1兼容规范的存在。因此有兴趣于此的朋友们,请移步到《Go语言错误处理》这篇文章吧。
注:本文所涉及的示例代码,请到这里下载。
微博:@tonybai_cn
微信公众号:iamtonybai
github.com: https://github.com/bigwhite
微信赞赏: